

Hobby Model Mig 21
Hobby Model Mig 21:
Fly Model IL-2
Fiddlers Green Gee Bee "R"
GPM F15C
GPM F4C
Maly Modelarz TBD-1
Fly Model Mig 23
Marek Pacynski's Bf 109F
Marek Pacynski's F6F-3 Hellcat
Ki 43 "Oscar" EAA picture review
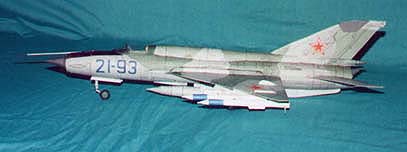
The Mig21 comes with six sheets of parts. I scanned the sheets and then printed them out on 90# Exact Index paper on my HP-712C. I have started doing this to all my models as I prefer to work with this weight paper. Remember if you do this you will want to seal the sheets after they come out of the printer as most ink jet printer ink is not water proof. The model is done in a grey and green camouflage with the red stars as marking. Looking at the sheets the impression I got was that the models were not as detailed as the Fly Model or GPM but were more detailed than the Modelcard/Modelick.
The instructions on this are not very good, there are top and side views but no interior view which caused me some problems. There is one drawing of the main landing gear shown from a front view and none for the nose landing gear. There are no drawings for the wheel wells and the cockpit. Because of this I would not recommend this model for a beginner. You need to have built a few of the Polish models from companies with better diagrams to get a feel for construction techniques.
The fuselage uses the bulkhead and connecting strip technique rather than the butt connections that most of the other Polish model designers use. I had some problems with the size of the after bulkheads but because of the strake on top was able to make the corrections and then cover them up when I glued the parts to the strake on top. The biggest problem I had was with the wheel wheels. Since there were no diagrams I had to figure them out, I did not cut the wheel wells out until I had the fuselage completed. I would recommend that if you build these models you cut these out before assembly. Watch the mail wells as they hard to put in if you attach the wings first.
Tail section was very straight forward and easy to assemble. Wings went together well, I do not like the interior supports that are provided. They were very week, I would suggest that you double up on the supports to get some strength to them. Watch the wheel wells, there is a center section that fits through the fuselage and you must place it correctly or the interior of the wells in the fuselage will not fit correctly. The interior of the wells must be placed inside the wings and fuselage before you finish the wings and attach them to the fuselage.
The landing gear went together very well. You are provided all the circles you need to make the correct thickness wheels. Remember when building these Polish models that the * means to back the part up on a piece of cardboard. This is the point that I am at right now, I have the cockpit to finish and the details to put on the exterior of the aircraft.
Overall I would rate this as a good model, it is as good as the Maly or Modelcard/Modelick models. The big fault I found was the lack of diagrams, not reading Polish the diagrams are a necessity . The model looks very good and I will post pictures of it when I finish so you can judge for your self. This companies models are worth your attention especially since they do a lot of models not done by anyone else. I have just received the Su34 and YF22 from this company and both look as good as the Mig21.
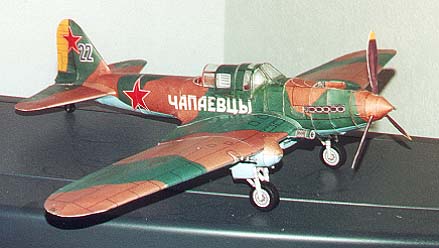
This model comes with two other models, the I-16 Rata and the Ju 87 Stuka. Prices for the model are PMI has it for $12.00, Hobby Factory at $10.00 Canadian Dollars and S&S; 19.80 DM. You can get the address and price conversions from the Teuton web page at http://www.teuton.org/~saulj. I think this is a great price from any of the companies since you get all three models.
Instructions for the model are in Polish but there is a great set of instructions that lead you through the construction step by step. The only good I had was in the last two sections of the fuselage and it was my own fault for not following the diagrams. The model is in green and brown topside camouflage with blue undersides. Red stars are on the bottom wings, fuselage sides and on each side of the tail. Elevator is done in yellow. Model has a detailed cockpit and wheel wells. Model has full landing gear and propellers.
Design of the model is very good and the parts fit together well. The forward part of the fuselage is of the egg shell construction which reminds you of building a ship while the after section is of the butt and glue type. Tail section and wings are very straight forward. I used poster board to make the internal supports for the fuselage, tail and wings.
Ratings for the model:
1. Instructions -- In Polish
2. Diagrams -- Excellent
3. Fit -- Excellent
4. Coloring -- Excellent
5. Difficulty -- Moderate
Over view: Well designed as are most all of the Fly Models. This would be a good model to start your move up after building a few Fiddler Green models. Since the instructions are in Polish I would recommend that you build a few with English instructions before attempting something like this.
I am constantly amazed at Chips talent as an engineer as well as an artist. How he got the shape of the fuselage without internal supports is an amazement to me. I guess that is why I am a builder rather than a designer. The model comes on a single sheet of 8 1/2 by 11 card stock. You can get the model over the Internet from Paper Paradise or get it on Fiddlers Greens CD. Cost to download the model is $1.00 and I think the hard copy version is $3.00.
There are 19 separate parts on the sheet and the aircraft is done in red and white. Chip does a lot of research, I have been through the Pima Air Museum with him, and his colors and marking are usually very good. The colors and marking on this model match up very well with the pictures and diagrams that I have. Fiddlers models have instruction on the same sheet as the model but they now have included a separate sheet that has instructions and a picture of the blown apart model. The instructions and easy of assembly make the Fiddlers Green models the ideal model for someone is just starting this hobby.
I started construction of the fuselage first. Cut out the parts and shape them. Make sure that you glue the engine plate to the tabs on the engine. All the other tabs are used to make a good connection with the next part but the tabs on the engine fold down and the engine plate is glued to them. One you get all the fuselage sections formed they just slide together. Do the stabilizer next and make sure that you bend the little tabs marked Bend down as they will attach to the fuselage. The bend down is a little confusing but remember the rivets should face out from the fuselage, the other side is the side that is glued to the fuselage.
Next I did the wings, when doing the wings on the Fiddlers models I usually use a tooth pick or small dowel inside the wing to get the correct shape. Had some problems with the wing fillets getting the correct shape. Because of the size and trying to glue this rather complex shape I did get some smearing of the red ink from the fillet on to the white part of the wing.
Next was the landing gear and this is the most difficult part of the model. To get the shape of the gear is difficult. Chip says to use buttons or cereal to make the wheels. I just kept gluing circles of card stock together until I got the shape I wanted. I like the method that Prudenziati uses on his models to make the wheels.The entire wheel is cut out and then folded into shape. Much easier to make and look more realistic.
Ratings for the model:
1. Instructions -- Excellent
2. Diagrams -- Excellent
3. Fit -- Excellent
4. Coloring -- Excellent
5. Difficulty -- Easy
Overview: As all Fiddlers green models these are great little models to start on. The only criticism of this model I would make is the landing gear. Not being a designer I could not make any suggestions on how to fix this. I would like to see the wheels made as I stated above.
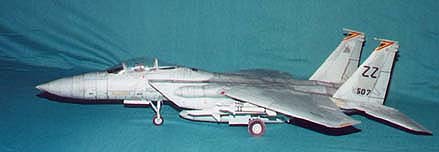
It seems that anytime you think that you are getting good at some skill something comes along that humbles you. I built several of the earlier GPM models and found them to be of moderate skill level that made up into very nice models. When GPM started redoing their models and released the new ones, it is a very different ball game. These models are some of the most detailed cardmodels on the market but at the same time have become some of the most difficult to build. These are not models for the beginner, you should have built several models before attempting any of these. Also you need to know that these new GPM's are not an overnight project. I have built the F4B and the F15C and they both have been projects that have taken about a month to complete.
The F15C consists of 16 pages of (approx.) 8 ½ by 12-inch paper. There are also two sheets of internal frames. Colors are of the modern day fighter, blue and gray. Instructions are in Polish and there are only limited diagrams. This gave me some problems in several areas, as I could not determine how things went together. This is where my scanner and ink jet printer came in handy. I could print out the parts and experiment in constructing them, if I goofed up them I just printed another set of parts out and tried again.
I started with construction of the fuselage. The forward part of the fuselage is of straightforward construction. Be careful when building it as the fit is very tight and you have to do a lot of dry fitting to get it right. You might want to cut out and glue the nose wheel well at this time even though it is out of number sequence. The rear section of the fuselage, parts 10 to 19 are the most difficult on the entire model. This is the boxy rear section of the fuselage that has many compound curves. I made many mistakes in this part of the construction and had to print out some parts on regular paper to glue over these mistakes.
GPM has a very interesting way of making the exhaust on there new models. When I built the F4B I never understood how to do this and they did not come out correctly. I messed up one exhaust on this model before I figured out how to do it. I cut out parts 32 (or 33) and 32a (or33a) and glued them so the 32 was front side and the a was the backside. Then by bending and gluing the fingers together I finally got the correct shape. Intakes go one next, no problem there just make sure that you get the piece that goes between the fuselage and intake even and glued before attaching the intake.
There is a strake on each side of the fuselage that the wings attached to. Build these and then attach them to the wing. Do not try and build then on the fuselage. Make sure that you get them even on each side. I did not and one wing looked lower than the other. The wings glue to the strake on each side. Cut the wheel wells out and glue the well into the wing before gluing the wing together. Trying to put them in after the wing is built can be tricky. Ailerons and flaps are built separately and attached to the wing after it is finished and attached. Fit here was good.
Fin and rudder goes together well and fit was good. Making the sensors on here can be tricky but it did come out very good. Stabilizer elevators are a little tricky. The end is larger than the part that attached to the fuselage and there is a piece you must put into the stabilizer to make it look correct. Attaching to the fuselage was were I had the most problem. I really had to stretch and move parts around to get a good fit.
I put the four Sparrows and four Sidewinders on the aircraft, they were easy to make and look very realistic. The cockpit is very detailed with control panes and ejection seat, no problem with fit here. I purchased a Gomex canopy from S&S; but it was for the Hobby Model version and did not fit. I cut the pattern that came with the model and using acetate made my own. The pattern was very good and the canopy looks good.
Ratings for the model:
Instructions: In Polish
Diagrams: Excellent
Fit: Excellent
Coloring: Excellent
Difficulty: Very difficult
Overview: A beautiful model but a difficult to build. This is not a model for beginners, you should have card modeling experience before attempting this model. When completed this will be a model that you will be proud off.
Review of GPM F4B(?)Mig Killer
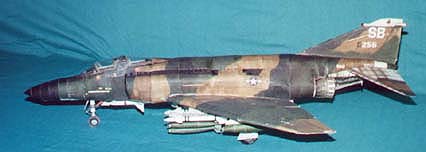
This is another of these extraordinary models from GPM. Difficult to build and they take quite some time to finish but when done they make some of the finest card models that you will ever see. As I have said before these models are not for the faint hearted, I have attempted three these aircraft having finished two. The third, the first one I tried, the A6 wound up in the trash after I goofed the tail up. Do not attempt this model unless you have experience with card models, lots of patience and the time to finish it. If you have these I guarantee that you will have a model you will be proud of when you are finished.
GPM has labeled this as the F4B but did it up in the Vietnam era camouflage. Having worked on these aircraft during this era, they were not F4B's but rather F4C's. Having appeared to mislabel the aircraft they did an outstanding job of coloring. The camouflage and marking are as I remember them being. The kit consists of 14 sheets of colored pages and two pages of formers. All sheets are in the European format, 8.5 by 11.7 inches. The instructions are in Polish and there are only two and a half pages of diagrams. While the diagrams are very well done there is some details that do not show up and they gave me some problems.
I started construction with the fuselage. GPM has gone away from the butt type construction and is using the connecting strip method. The fit was good but there are some problems in getting the compound curves. The forward part of fuselage is straightforward being nice and round but as you proceed aft it changes. Starting back of the cockpit the shape goes for square on the bottom to round on the top. They do not indicate that scoring is necessary but I found that in order to get the correct shapes you have to figure where it goes from square to round, it is not marked, and score at that area. Once scored you can shape the square and round parts to shape. Watch the pieces that make up the flat bottom of the fuselage. I had some problems getting them to fit correctly and had to print out some extra parts to fill in the area where they connect to the upper part of the fuselage.
Once the basic fuselage is done then you will construct the intakes, cockpit, engine exhaust and missile bays. Intakes and missile bays went together with a good fit. Cockpit the same except for the seats, I had to cut them down to get the canopy to fit correctly. BTW the cockpit is extremely detailed. The engine exhaust gave me the most problems with the fuselage. I did not get them correct on this model, I finally figured it out on the F15C. Here is what I finally figured out, glue pieces 26b to the back of 26a before making any cuts. When the glue dries cut the feathers out and then score at the bottom of each feather. Bend and glue the feathers together and you will get the correct shape of the exhaust.
Wings were next, they are done in two parts. Inner and outer so that you have the option of having wings folded or in the down position. The ailerons and flaps are also separate, build the wings and then attach these when done. Watch the wing connectors on the top of the wing, they must be bent and glued so there is a top and bottom. I cut the wheel well doors and put the wheel on the bottom of the wing before constructing the wing. I had some problems in attaching the inner and outer sections of the wing. I still do not thing I got the upward sweep of the outer wing correct. Watching attaching the wings to the fuselage, this has to be done just right. I did several dry fits before I glued it in. The center of the wings meet on the bottom but they give you a piece to cover the point where they meet so it does not need to be exact.
Tail section went together with no problems. Only problem was attaching the stabilizers to the fuselage. The stabilizers are supposed to sweep down but I had a hard time doing this and I still do not thing I got it correctly. Landing gear is detailed very well in the diagrams and I had no problem in building them. BTW I use wire inside the gear, I have found this gives me the strength I need to hold the model up.
To finish the model you can now put on the external fuel tanks and weapons. The model comes with three external tanks, six 750 lb. Bombs, four Sparrow missiles and four Sidewinder Missiles. I did not like the bombs that came with the model so I took six 750 lb. Bombs that came with Emil's F15E and two 2000 lb. bombs that come with the Fly Model F18 and used them. Final configuration of my model is six 750 lb., two 2000 lb bombs, four Sparrow, four Sidewinder missiles and one centerline external fuel tank.
Ratings for the model:
1. Instructions - In Polish
2. Diagrams - Good (not detailed enough)
3. Fit - Excellent
4. Coloring - Excellent
5. Difficulty - Very difficult
Over view: Well-researched and designed model. The coloring especially the weathering on this model is striking. This is not a beginner's model, it is a difficult model to build and not having English instructions make it more difficult. It is, though, a model well worth building. It looks impressive when finished and it is something you will be very proud to show off.
Maly Modelarz TBD-1 Devastator
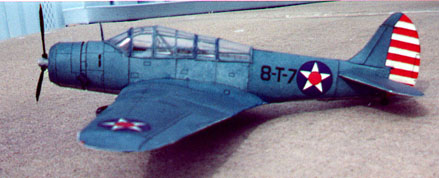
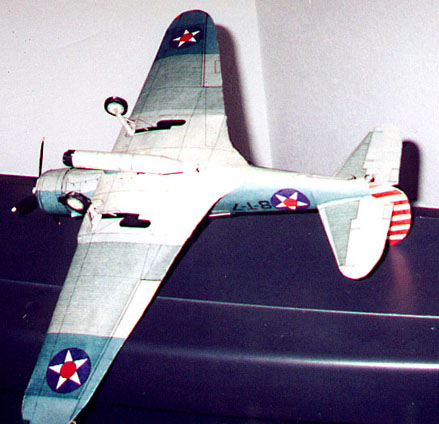
This is one of the "transition" Maly models designed in 1991. At this time Maly had gotten better inks but was still using the soft paper of their older models. I bought quite a few of their earlier models but decided not to build them as the paper and printing was pretty bad. To put this last statement in perspective, their new models have as good printing and paper as any of the model companies out their. I assume this is because they now have access to much better inks and paper. Since I grew up in Navy towns and spent the first seven years of my military career in the naval aviation I like to build naval aircraft. I never worked or flew in this aircraft but I did both work and fly in the aircraft that replaced it, the TBM/TBF.
The model consists of four sheets of colored A4 paper and one sheet of internal formers. Instructions are in Polish but there are two and a half pages of diagrams, which are very good. I found no problems in following these diagrams while constructing the model. Since I do not like the paper it was printed on, I scanned it and then printed it out on 90-pound Exact Index cardstock. During this process, which I do in Adobe Photoshop, I changed the upper colors to more of a blue which my reference works indicate the actual aircraft was painted.
Looking at the model I would classify it as an intermediate class model. It would be a good model for a beginner, about the same difficulty as the PMI or Modelcard/Modelick models. This is a very well designed model, the fit was one of the best of any card model I have ever done. This is one of the oldest card modeling companies in the world so do not hesitate to buy any of their newer models. For those of you who want to try something a little more difficult than the free downloads this is a good company to start with.
I started construction with the fuselage. Watch the diagrams for construction of the cockpit. The cockpit is detailed but you must build it as you construct the fuselage not after you have finished it. The torpedo that comes with the model fits half inside and half outside the aircraft. I did not cut the hole to fit the torpedo until after I completed the model and that seemed to work just fine. Watch the construction between the engine compartment and the mail fuselage. There is a small piece that mates these and it leaves a space around the engine.
The wings are done in three parts. In order to make sure that I got all three parts I beefed up the internal formers. I doubled the thickness and then I put pieces between the ribs. They use the one vertical former with ribs down this former. I like the method that Fly Model uses where there are internal formers as big as the entire wing. Using this method it keeps the wings from warping when you attach them to the fuselage. When I got the extra formers in-between the ribs the internal structure for the wings was very solid. I glued the center section of the wing to the fuselage and the formers. I then glued the inboard section of the wing to the center section. I did not form the wings but rather matched the inner and center sections on the model and then glued the rear section together. This gave me a good shape and every thing matched up just fine. I then did the same for the outer section of the wing. While on the wings, they did not do the wheel wells on this model. There is black ink to show where the wheels would retract into the wing but there are no wells.
Tail section was very straightforward and went together with no problems. Canopy was a little difficult, as there is much cutting if you want to make it clear. Since the canopy is very large and made of many separate parts of glass It took sometime to get it cut out but is was well worth it to be able to see inside the cockpit. Torpedo is a nice touch and as every thing else on the model went together well. The tail fins on the torpedo are inked on only one side so you will need some gray paint to do the other side. Used my new circle cutter to cut the sections of the wheels out and constructed the wheel struts. I could not figure out how they wanted the tail wheel attached so winged it and got it so it looks as close to the drawing as I could.
Ratings for the model: 1. Instructions - In Polish 2. Diagrams - Excellent 3. Fit - Excellent 4. Coloring - Fair (poor paper and the colors are slightly off) 5. Difficulty - Moderate
Overview: Very well designed model, the parts fit really impressed me. I would suggest if you do try this that you transfer it onto a better quality paper. This would be a good model to either start on or move from the simpler models on. The model makes up into a very impressive little aircraft when finished.
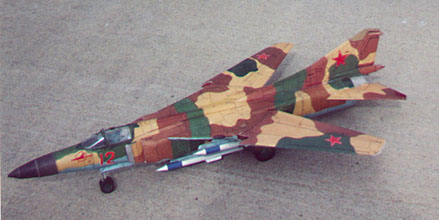
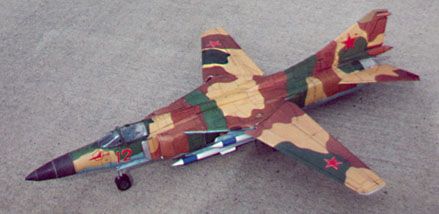
I started this model after finishing the GPM F-15C as I thought it would be a simple project after the complicated F-15. Well it was not, this model was as complicated and took as long to build as the above model. As with most of the models out of Poland this models instructions are in polish. To make it more complicated there is only one sheet of diagrams and they are not very intuitive. I had problems figuring out what they wanted with the swept wings and the intakes. The drawings were not much help and I had to do some experimenting to get these correct. They give the drawings to make the wings so that they can be movable but it did not work with me. Even though I used fairly still card stock I could not get them to work correctly so finally gave up. I left the wings so that they could be swiveled in any position but they are not tied together and you must set each wing separately.
Construction started with the fuselage. Construction is of the standard butt and glue that we see in most of the Polish models. The area where the wings will fit is built as a separate box that the wings will fit in at a later time. There are three pieces that you must cut holes through and match up so that you can fit the pins the wings swivel on when you attach the wings. I had no problems with the fuselage construction until I got to the intakes. Since I had no directions and the diagrams were not very clear it took me several attempts to get the intakes correct. It is a very elegant method to get the shapes and areas between the fuselage and intake correctly but it is no very intuitive. I put the cockpit in the fuselage as I built it but did not do this with the wheel wells. I built the fuselage and then cut the area where the wheel wells were to go and then glued them inside the fuselage.
The tail section was a complete disaster. I built and attached the elevators and they would not fit. I cut and modified them until they did and after I finished I found there was a piece that would have made them fit. The diagrams do not show this but if you build this there will be a big gap on the top of the elevators if you glue them on correctly. There is a piece that will cover this gap, it looks weird as there is a gap on the top and not on the bottom. I attached the rudder and found that I had to really bend things around to get it to fit correctly. Again after finishing the model I found that there were additional formers that I did not put in the rudder which would have made it fit much better.
When constructing the wings you must make the pins that go through the box you built in the fuselage. This will allow the wings to sweep forwards and back. You then cut out a set of gears, which are supposed to interlock inside the fuselage and allow the wings to move together. I got the pins to work correctly but could not get the interlocking gears to work. There was too much give in the box to hold the gears in the right place and the ends of the gears fray out easily. If you want to have the wings sweep together than I think you may have to construct the box and gears out of wood. Also watch the front of the area where the swinging wings touch when the wings are all the way forward. The wings will push this area up causing the wings to sweep to far forward. If I build this again I will reinforcement this area.
The wheel wells went into the fuselage easily but the landing gear is very complicated. The nose gears is simple enough but the mail gear has many pieces because of the way the gear retracts up into the fuselage. I simplified this, as I did not want to spend the time making all the small parts. I then made the center line tank but did not like the missiles that came with the kit. I printed out four of the missiles that came with the Hobby Model Mig 21 and constructed them for this aircraft.
Ratings for the model: 1. Instructions - In Polish 2. Diagrams - Poor (only one sheet and not very instructive) 3. Fit - Excellent (except for my mistakes) 4. Coloring - Excellent 5. Difficulty - Difficult
Over view: Makes up into an impressive model that I can show with the wings swept in any position. This is not an easy model to construct, you should have experience in building card models and in particular card models from this company. The lack of directions and instructions make this a model only for the experienced.
Review of Marek Pacynski's Messerschmitt Bf 109F
Marek sent me three of his models as thanks for trying to get someone in the U.S. to carry his models. They are carried by S&S; in Germany under the Kartonowa Encyklopeidai Lotnictwa. The models are in 1/50 scale and come on A3 paper, at 8,90DM ($4.00US) they are well worth the cost. Marek sent me the models as PDF files across the internet which was a problem since they are in A3 format and my printer will only print 8 ½ by 14 inch paper.
I took the files up to Wisconsin and my son printed them out on the Xerox Docucolor for me. He also informed me that all Office Max's are no being re-equipped with the Docucolor so if you get files of this size you will be able to get them printed there. When I got home I got a copy of Acrobat and found that I could split the A3 PDF file down into two separate sheets that printed out fine on my HP 712C. The colors came out very good on the inkjet version but were washed out on the Xerox copy. I will put a picture up on the web site soon and you will notice that the number 14 on the sides which is supposed to be yellow is faded and you can hardly see it.
The model is done in desert camouflage, top is sand and the bottom is light blue. An interesting effect is that the fuselage is done in a lighter color while the wings and tail section is darker. As I said the yellow markings and nose faded on the Xerox copy but on the inkjet copy all colors came out. The model does have the makings for a cockpit but the wheel wells are just printed on the bottom. At this stage in my life I do not try and do cockpits or fine detail on the 1/50 models as it is to hard for me to see or manipulate parts that small.
Marek used the "butt" method of construction on all the models he sent me except for this one. There are six strips located on the sheet that has the three views, these are to be cup out and glued around the formers for the sections to be attached to. Construction and fit of the fuselage was straightforward and presented no problems. Wings are constructed in three parts, the center section and then the two outer wings. Do not worry if the center section does not exactly match up on top, as there are fillet strips that will close any gaps. Make sure you make the cuts where indicated on the bottom so the bottom will form around the fuselage. Marek uses a former inside the fuselage to attach the rudder, I never figured out how exactly it was supposed to fit so I winged it and put it in the best I could. Landing gear is very well done, I use a thin piece of wire inside to give them strength both main and tail gear. I like the idea of doing both sides of the wheel well doors, a lot of companies only do one side leaving you to have to color the other side in your self. The four cooler/intakes went together easily and fit one under each wing, one under the nose and one on the side of the nose. Finally I did the propeller, again I use a small piece of wire in each blade to give it strength. Formers in the spinner fit nicely and the prop looks good on the finished model.
Ratings for the model:
1. Instructions - Can not comment on these as Marek did not send any to me
2. Diagrams - Excellent
3. Fit - Excellent
4. Coloring -- Excellent
5. Difficulty - Moderate
Over view: A nice little model and should serve as an intermediate step between the easier models and the more complicated models such as the GPM or Fly Models. I built the model in just a few nights and found it a good break from the more complicated models. At $4.00 USD from S&S; in Germany, well worth the money.