
Review of the é-Coeur basilica in Montmatre
Review of the Light ship Ambrose
Review of the HMV Tug Boat Resolut
Review of the Nakladac UNC 060
Review of the Schreiber Camel F-1
First, a short introduction…I recently was forced into an early retirement through attrition. Not wanting to retire early; but receiving a fair retirement package, I decided to sit back and take advantage of it for a while at least. A part time job somewhere in my future is for sure.
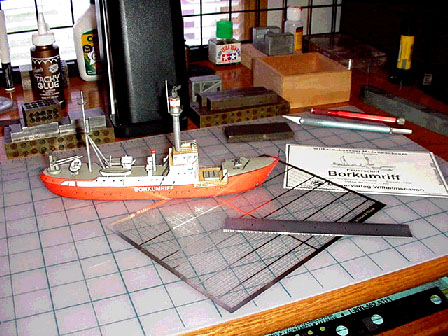
One of the things I've wanted to do, is build a ship using photo-etched railings. I chose HMV Railing II Set (#133002) from Scheuer & Strüver and Wilhelmshavener's model of the Lightship "Borkumriff" (#1033) as a starter model. The Borkumriff; I had built once before many years ago and remember it to be a good beginners model. My memory had not deceived me through the years for the Borkumriff is indeed a simple and well designed for a beginner. It builds into a cute little ship giving the modeler just enough different folds and curves to aid in developing the skills needed for some of the more complex models.
I began by studying the general construction of the kit in terms of where the railings were to go and if any railing would cause a problem with the construction of certain assemblies. Having determined that the railing caused no problems I began with mounting the ground plate to a piece of plastic like the kind used for screen door window replacement. This can be found at most local hardware stores and many times the scrap pieces do just fine while the cost is usually perfect at… no charge. Once the formers were set in place, the hull sides were cut out and the railing near the bow on each side removed and set aside. Coloring the edges with a red felt marker was next. The curve at the stern or rear of this model is perhaps the only real difficult part of the assembly. The stern needs to be curved in two directions. A little practice and you soon will have it curved just right.
 Once the main deck has been glued to the hull, proceed with the next numeric sequence step.
Usually after the main deck has been set, I will remove the ship from its plastic base.
Building the rest of the model is pretty much straight forward and presents no problem or bridges to cross at any point. The thing to remember is to remove any paper railings from the part before attaching that part to the model. So as to avoid any confusion I labeled each railing with its part number and where it would go on the finished model. Thinking ahead now, I would have attached the photo-etched railings to certain parts before attaching these parts to the model. Thanks to the Almighty, I still have a fairly steady hand and could attach the railing pieces after the model was complete. I certainly will try to avoid this when building future models.
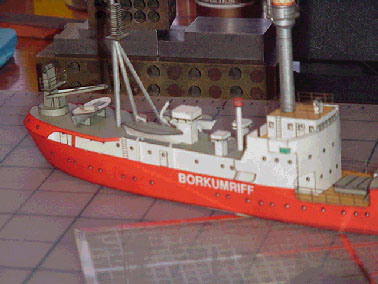
 Some modelers feel it is not in keeping with the spirit of paper modeling to add other materials to your model such as dowels, metal parts, etc. I feel that if you want a model to look nice no matter what media you build in, use whatever means may be available to you. Here I used plastic rod to strengthen the after mast. Yes, it is still a paper mast that was wrapped around a plastic rod that had been sanded to shape. Likewise the tall vent amidship with the red cap is a piece of plastic rod, while the red cap is made of paper from the kit.
Once the model was complete, I had to decide if I was going to go forward in attempting to attach railings or leave well enough alone. Here; let me insert a preference of my own. I have built a great many paper ship models in my lifetime and the one thing I always disliked was the white paper railings. They always seemed to distract from the beauty of the model itself. In many cases, I've wanted to just leave the railings off completely. This model of the Borkumriff really looks quite attractive without any railings at all.
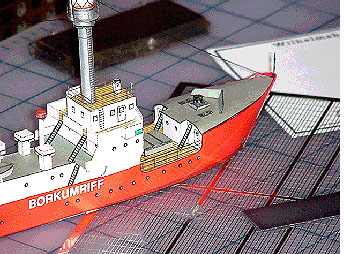
 Having said that, I decided to go ahead and attach the railings or at least make an attempt at it. Much to my surprise, it worked out very well as can be seen in these photos. A word here about painting the railings. Had I wanted to paint the railings, I would have followed HMV's instructions regarding the preparing of the photo- etched material to accept paint. In this case, I felt I wanted to leave the railing natural as it gave the model a unique look. If one looks at a ship from a distance, you often do not see the railing. The railings will often blend into the superstructure making them almost invisible.
I chose to attach the railings with Aleene"s Tacky Glue applied with a toothpick. To start, I went back to original paper railing as my guide remembering that I had labeled each railing and where it went. HMV's railing set II does not line up correctly with the paper railing and I found that I had to make adjustments along the way. The paper railings do however give you a starting point in terms of length. The circular railing was the most fun to do, for as I mentioned earlier, I would in the future attach many of the railings as I am attaching the part itself. Nonetheless, I was able to roll the circular railing to just the right size to fit the platform and with steady hand glued them in place. One railing around the light on the fore mast, and the other on the after mast. Sense the HMV's railing set does not match the kits railings; I took a few liberties in length and folding. I do believe however that the results are still impressive.
Will I do more models with photo-etched railings in the future? You bet I will, I already want to start the HMV model of the "S.S. Feldmarschall" with its own photo-etched detail set.
Don Kenske
November 2000
This page was created by:
Saul H. Jacobs M.Ed.
Avionics Specialist, United States Air Force (Retired)
Microcomputer Technology, Pima Community College (Retired)
Tucson Arizona