
GPM #43 Panzer 38(T)


The Tank
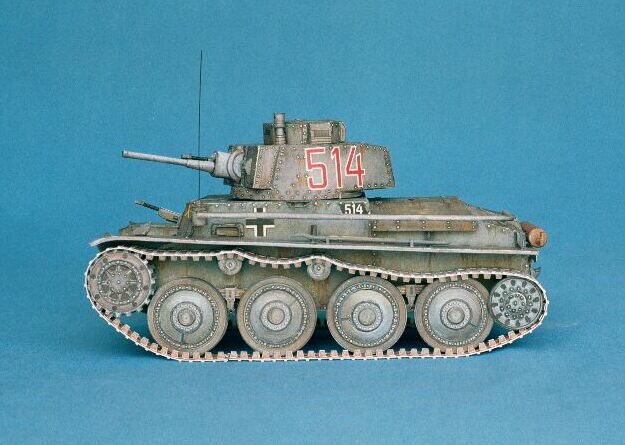
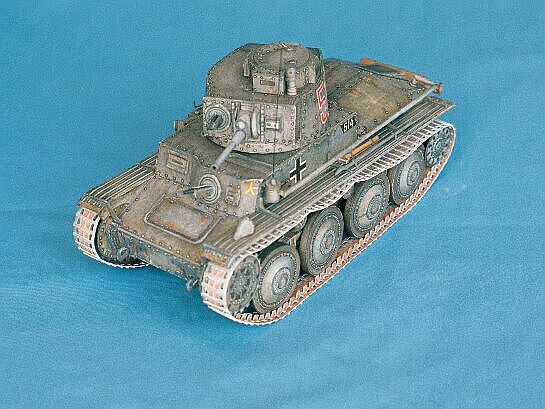
The PzKpfw 38(t) is based on the Czech designed TNH P-S light tank. When the Germans overran Czechoslovakia they re-designated it and kept it in production through 1942. The 38(t) also served as the basis for several special purpose vehicles including the Hetzer 38(t) which was one of the best German tank destroyers of WWII. The tank was manned by a crew of 4 and carried armament consisting of a 37mm main gun and two 7.92 mm machine guns.
The Model
This is one of the new series GPM models in the green covered booklets. As with all of current GPM offerings it is an attractively packaged model. In addition to the color photos of a built up model the booklet includes about 10 B/W photos of the actual tank interior and armament. The model comes printed on 5 ½ pages with the half page consisting of a textured German flag and a half torso tank commander figure that can placed on the turret hatch.
I think this is a very impressively colored model. The model is printed in Panzer gray and heavily, but realistically, weathered. I think the weathering job on this model is much more convincing then the one on the GPM P-47 Thunderbolt. The effect of the finished model is as convincing as any plastic model that has been weathered with airbrush and pastel. While the coloring is masterful the printing is less then perfect. Some of the part outlines are light with some of the tab outlines literally disappearing. The color printing is sometimes soft at the part edges giving a fuzzy feel to some parts. The effect is one of the model being rendered in water color rather then printed in ink.
This is not to say the model is poorly printed. I enjoyed the visual appeal of the model booklet so much I was hesitant to cut it up and build the model. However, when I finally bought an OLFA circle cutter I decided this was the perfect model to try it out on.
Because of the hand drawn quality of the model I had some concern about parts fit,however, the model went together very well with only some minor fitandconstruction issues. Over all the construction of the model was straight forward and I would characterize this as an easy intermediate level model. Because of the straight forward construction and attractive finished result I would recommend this model as an excellent first armor model.
Construction starts with building the framework (W1-W8) for the tank hull (1-5). Thisresults in the first fit problem as the framework is a little undersized for the hull skin. I glued a 1/16 sheet of balsa to the bottom and front underside of the hull framework and it fit perfectly. Another problem with the hull is that the hole cutouts for the turret mount on the framework and the hull skin do not line up. I cut out the hole as indicated on the hull skin (2) after the hull framework had been covered with the skins. I then built up the hull and attached the fenders (6l, 6p). There is no colored skin for the underside of the fenders so they should be painted before assembly.
After the basic hull assembly I then built the turret as a separate assembly. This resulted in the second fit problem. The formers for the turret framework (WW1-WW2, 31b) are oversized and need to be trimmed down for all of the turret skins (31-31e) to fit together correctly.
With the turret and hull assemblies completed I built the wheels and suspension. This resulted in the third set of fit problems. The drive wheel sprockets (11, 11d) are not all uniform in size. Since the sprocket holes in the threads (14, 14b) are intended to be cut out it is important to test fit the drive wheel sprockets and trim to fit as necessary. Also the drive wheel spacer (11e) is too narrow. Cut a slightly wider one or shim the wheel halves until they are the correct width for the thread sprocket holes.
Building the threads was next. This was probably the most tedious part of the model because all of the sprocket holes has to be cut out. However, it went quicker then I thought, taking about 2 nights to build the threads. The threads are sufficiently long to allow them to be draped realistically. The threads also presented the last problem area. There are supposed to be two wheel guide sprockets (14a) on each thread, one on each side of the road wheels (13-13f). However, if you double the parts over so there is printing on each side then there will only be enough parts for one sprocket on each thread. While the photos of the built model indicate that this is how it was built it would be nice if the appropriate number of sprockets was provided.
At this point the only things remaining were to build the muffler and attach the small hull details. The result is a very attractively finished and realistic looking model that I think would be an excellent addition to any ones model collection.
The model is available from Pelta in Poland, S&S; in Germany, and PMI in the United States.
This page was created by:
Saul H. Jacobs M.Ed.
Microcomputer Technology
Pima Community College
Tucson Arizona