HMS
Glowworm
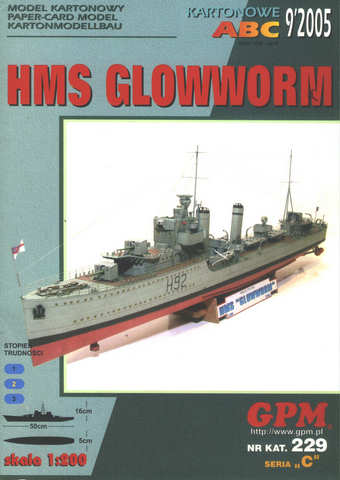
The kit is labeled a 2 on GPM's 3 point scale, but their web site labels it "difficult."
First Looks For 2005/2
The First Looks column has some very interesting subjects this month, including two new offerings from the North American licensee of the well-known Micromodels brand. It's particularly heartening to see an increasing degree of diversity in the models submitted for review -- including architecture and ships in addition to the usual aircraft. I'm also encouraged by the increasing number of contributors who are willing to submit out-of-the-box reviews of their own recent purchases to give the rest of us a "heads-up" on what to look for, and what to avoid. Diversity is great in a column like this; it helps to guard against just one person's taste in models and a single point of view about attractiveness and quality. Keep the submissions coming! And feel free to contact me if you'd like to suggest an item for the column.
Please note that even though we have to rely on models that contributors send for review over the Internet, we do get a reasonable number and variety of contributions from on-line designers and distributors. As far as hardcopy donations are concerned, we will have to wait until Saul Jacob's return, and reactivation of the purchase-review-sale cycle that he's been so successful in managing. It goes without saying that additional contributions of downloadable kits for examination and review would be gratefully accepted. We're still in need of vehicular subjects, and could certainly use more maritime and architectural items. Many thanks to those who have contributed to the column by giving us a "first look" at new releases they have recently purchased. Your help is sincerely appreciated.
And now for this issue's First Looks....
|
HMS
Glowworm |
||
 |
Description: | British pre-WW2 "G-class" destroyer |
| Kit: | GPM #229 | |
| Scale: | 1:200 | |
| Designer: | Grzegorz Nowak | |
| Format: | 18 A4 pages, including 9 pages of parts, 6 pages of construction diagrams, 3 pages of instructions (in Polish, German and English), plus 7 color photos of the completed kit on the front and back covers. | |
| Parts: | There are 98 numbered items, but probably more than 350 parts. GPM also has fittings kits for this model. | |
| Difficulty: | Advanced The kit is labeled a 2 on GPM's 3 point scale, but their web site labels it "difficult." |
|
History:
GPM's newest release is one of the most gallant ships in
British naval history. On April 8th, 1940, the destroyer HMS Glowworm
was sailing alone in poor visibility when she suddenly ran
into a German battle group of 4 destroyers and the heavy
cruiser KM Admiral Hipper. The short, vicious, battle began at
point-blank range, and the range dropped to zero as the dying
destroyer actually rammed the German cruiser before sinking. The
resulting damage forced the Admiral Hipper to return to port.
The cruiser's CO, Captain Helmuth Heye, tried to pick up all
the British survivors that he could. Later, he sent a message through
the International Red Cross recommending the Glowworm's captain, Lt-Cdr
Gerard Roope, for the Victoria Cross posthumously; the only time in
British history that such an award was recommended by the enemy.
For more details, see
HMS
Glowworm
Memorial Website
Military
History Encyclopedia on the Web - HMS Glowworm
Kit:
The colors, detail and printing registration of the model are
excellent. The instructions are in Polish, German and English, and
there are very clear sub-diagrams to illustrate building specific
modules, such as deck houses, gun mounts, etc? Further, there are seven
color photographs of the completed model on the cover of the kit.
The model follows the usual rib-on-frame method of construction. But
Nowak did something I've never seen before with the ribs. He provided a
5mm wide strip running along the outside of each rib, to make it a "T"
shape. That makes the ribs "wider" and simplifies attaching and
aligning the underwater hull. This should be a big help for that
difficult step. There are also no blank white interior sections -
everything is planned. Otherwise, the usual construction sequence for
ships applies. First you laminate the major parts; then install the
ribs to the spine; apply the hull sheeting; complete the underwater
hull; add the decks; build the deck houses, masts, and funnels; and
then add all the many deck details like the ventilators, guns, boats,
torpedo tubes, searchlights, D/c rails, etc?
This kit is designed as a full hull model, (although I plan to
build it as a waterline one.) GPM makes 2 fittings kits for
the model, one for gun barrels and a photo-etched kit
of railings, ladders and deck fittings. They also suggest a
third photo-etch kit, a general kit of for more railings.
Overall, this appears to be an excellent model of a
justifiably famous ship.
Rich Marsh
|
Grumman
F8F-1 Bearcat |
||
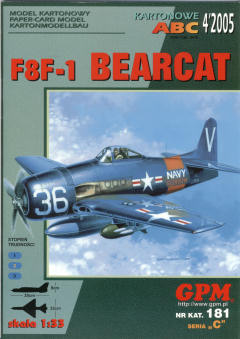 |
Description: | A replacement for the highly successful F6F Hellcat, the Bearcat did not see combat service in WWII, the prototype being flown in 1944. The aircraft was 20% lighter and 50% faster than the Hellcat. The first production model was flown in 1945. The F8F featured all-metal construction, a cantilever low-wing monoplane design, folding wings for carrier operations, self-sealing fuel tanks, four .50 caliber machine guns, pilot armor, and a retractable tail wheel. |
| Kit: | GPM no. 181 (4/2005 re-release) | |
| Scale: | 1:33 | |
| Format: | The model comes in an A4 booklet with photos of the completed model on the rear cover and inside on page 2. There are seven pages of card parts, two pages of pictorial instructions, and general layout plans on the rear cover. | |
| Parts: | 428: 18 cylinders of six parts each accounts for 126 of the total | |
| Size when completed: | Length overall: 25cm Height to top of tail plane from bench: 9cm Wingspan: 32 cm. |
|
| Difficulty: | Intermediate (2 on GPM's 3-point scale) | |
Kit: 2005 is now upon us and the new models are rolling in. The first to drop through my letter box is the delightful model of the F8F-1 Bearcat by GPM. The model is done in overall Navy Blue, numbered 36 (Glenview NAS). The first thing to note from the Photos supplied by GPM is the fully detailed Pratt and Whitney R-2800-34W 18 cylinder engine. Sadly this will be not seen when the cowling and the four-bladed propeller are attached. This engine though, could lend itself to a workshop strip down diorama!
Construction: Page one of the card parts has the Fuselage formers and wing ribs which have to be pasted to 0.08mm card; this page also contains the bending templates for the wire braces used in the construction of the model. The Fuselage is constructed using the former and crocodile teeth tab method. And is made up with nine sections.
The wings are nicely marked and the Cockpit interior, although sparse, has the side consoles added. On the negative side, silver instruments and levers do tend to get lost against the green background.
This reviewer was very pleased to see the inside lining of the cowl (parts 1,2 and 3) supplied. This liner is sometimes missed by other designers, necessitating getting the paint box out. Ordinance is supplied in the shape of two Bombs and four rockets and it is also provided with a long range tank, for which the constructor will have to make his own joint tabs. Wheel wells are basic but adequate. And as previously mentioned the fully detailed Pratt and Whitney engine can be modeled from the 126 parts supplied.
The pictorial instructions are clear and precise, but the bubble canopy will probably be the only frustrating area in the whole model. GPM will no doubt be able to provide the wheels and Cockpit canopy for this great little model. I hope to build it later in the year and do a photo construction guide for it.
First Impressions: Highly recommended. The difficulty level should be 2 out of 3 as suggested by GPM.
Jeff Sissons
|
Temple Bar (London Gate) |
||
 |
Description: | London City Gate |
| Kit: | Micromodels USA Set ARC XI | |
| Scale: | N/A | |
| Designer: | Matthew Sparks | |
| Format: | Six printed cards, approximately 3.5" by 5", with printed history (wrapper) and occasional construction diagrams | |
| Parts: | Approximately 60 pieces, not including bits of wire (to support heads on pikes if you are so inclined) wooden bollards, etc. | |
| Difficulty: | Advanced beginner | |
Kit: As detailed elsewhere in this issue, Matt Sparks has obtained North American rights to the Micromodels name, logo, and distribution, mainly for the purpose of continuing Geoffrey Heighway's work in creating highly detailed and extremely miniaturized replicas, in card, of important cultural and historical creations. Matt's first release under the new Micromodels USA designation is the Temple Bar Gate, the only one of the eight gates through the London wall to survive into the present time. (The gate's history is well detailed in the wrapper notes.) It's also the only gate that Heighway did not release with the original Micromodels line, and in this sense completes a project that the originator may have had in mind before his death.
Construction: Keep in mind that this is a tiny model; when completed it will take up only about 2" by 4" of space (5cm by 10cm) on your mantle or desk. Some of the parts will require intricate cutting to achieve the proper outlines, particularly important with some of the archways, door frames, buttresses, and so on. Take your time and use a very sharp blade. There are no gluing tabs on the pieces, and I would suggest creating some from plain paper to help insure proper shape and alignment with the larger buildings.
First Impressions: This is a beautiful little model, and I am eagerly looking forward to building it. Continuation of the Micromodels line with a designer committed to Geoffrey Heighway's selection of topics and style is a tremendous benefit to card modeling in general, and to Micromodels enthusiasts and collectors in particular. I'd place this kit at an "advanced beginner" level for the number of very small parts, though it could be done be a deft beginner with an experienced assistant available.
Bill Geoghegan
|
USS Arizona Memorial |
||
 |
Description: | USS Arizona Memorial (Pearl Harbor) |
| Kit: | Micromodels USA Set XIX "Pearl Harbor Remembered," Vol. 1 | |
| Scale: | N/A | |
| Designer: | Dan Shippey | |
| Format: | Four printed cards, approximately 3.5" by 5", with printed history (wrapper) and occasional construction diagrams | |
| Parts: | Approximately 30 pieces, not including parts carved from toothpicks, etc. | |
| Difficulty: | Advanced beginner | |
Kit:
My wife and I made a pilgrimage to the USS
Arizona Memorial when we
vacationed in Hawaii in mid-2003. It was a deeply moving
experience in many ways. The minute by minute appearance of
oil droplets from the Arizona's bunkers and the rainbow sheen they left
as they fanned out upon the water's surface was a constant reminder
that this is a living memorial and not just a testament to
the dead of December 7,
1941. Matt Sparks and Dan Shippey have done us all a great
service by bringing this kit to the card modeling community, and by
letting the model share in the tradition of quality
and historical accuracy that Geoffrey Heighway brought to the
Micromodels brand.
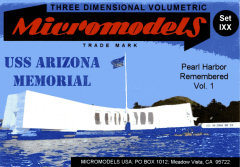
The Memorial part of the model sits over the submerged remains of the
Arizona, copied from an aerial or satellite image of the
ship. The ship is about 10" (24cm) long (to be attached to a
base), and the Memorial itself when completed will be a little under
three inches (7cm) in length. The model includes the full
interior of the Memorial, including the Memorial Wall, and the viewing
pool in the main section. It also has the mooring platforms
and those portions of the ship that still lie above the surface.
The copy I was given to review was from a pre-publication "beta"
run. There are printing adjustments still to be made, but the
kit looks to be very complete and true to the original. If
anything is missing, it's the entrance walkway for visitors; but that's
a pretty minor thing, and easily corrected by scratchbuilding a gangway
if desired.
Construction: Once
again, this is a tiny
model, and when completed, it will take up only about 3" by 10" of
space, most of which is devoted to the base. The Memorial
itself is only about 3" by ½" in size. Except for the window cutouts in
the viewing hall, the model should be fairly straightforward to build.
Carving a set of 1.5mm mooring bitts from toothpicks might be more of a
challenge, though I'd be more inclined to hammer on some brass or
copper wire to get the same effect.
First Impressions: For historic, if not nostalgic reasons, this is a must-have kit, and I'm waiting eagerly for the published version. The subject alone promises it an honored place when complete. The size makes display very do-able. As to difficulty, I'd place this kit at an "advanced beginner" level, mainly because of the number of small parts. A skilled beginner could probably handle it with a little help.
Bill Geoghegan
|
Henschel Hs-129 B3 |
||
 |
Description: | German WWII twin-engine ground attack aircraft |
| Kit: | Kancho's Designs Hs-129 B3 (2005) | |
| Scale: | 1:48 | |
| Designer: | Kancho Iliev | |
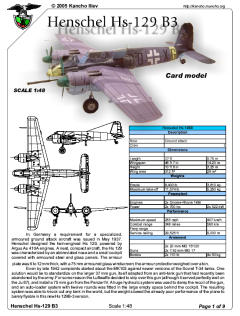
| Format: | Nine (9) downloadable PDF files totaling about 2,800 kb. The download consists of one page of background and specifications, one page of 3-D construction drawings, and 7 pages of parts letter (8.5 in by 11 in) format. Several of the parts sheets have additional construction drawings and photos. | |
| Parts: | 302 | |
| Difficulty: | Intermediate | |
Kit: With the Hs-129 Kancho continues his recent string
of unusual WW II aircraft. This ungainly looking plane was born
out of the need for a heavily armored ground attack aircraft that could
deal with the type of armored vehicles the Luftwaffe was expecting to
encounter. Though not a particularly large plane, the Hs-129 was
heavy, carrying over a ton of its own armor. Because of problems
in dealing with the Soviet T-34, the Luftwaffe decided to upgrade
armament to include a massive 75mm cannon taken from the Panzer
IV. As Kancho points out in his introduction, the Hs-129 B3 could
knock out any tank in the world with this weapon, buy carrying it made
the plane barely flyable.
Kancho has continued a couple of
very nice innovations he began with an earlier model this
year (the
Ki-87 reviewed in the last issue). He has
interspersed construction drawings and photos
throughout the parts sheets to help in building some of
the more complex subassemblies (cockpit, wheel wells, cannon
etc.).
He has also included links to a very complete gallery
of photos that shows step-by-step construction details.
The model is very detailed for a 1:48 offering, with over 300 parts to assemble. It includes a built-up cockpit interior, two detailed engines, three-dimensional wheel wells in the engine nacelles and highly detailed weaponry. There are fewer construction options than usual, though Kancho does provide for use of an opaque canopy (for those who choose not to build the cockpit). In the past he has offered a choice of laminated or cylindrical wheels (two disks and a wrap-around tread), but this kit offers only the option of laminated wheels, which I believe most builders would choose. He has also eliminated the use of gluing tabs on fuselage skins, and included a complete set of tabbed joining strips to allow for flush joints on the fuselage and engine nacelles.
Construction: Aside from the unusually large number of parts for this scale, many of them fairly small, basic construction of the model appears straightforward. Kancho uses few bulkheads in the fuselage, but rather relies on frameworks and skin layouts to control shape and rigidity. Much of the detail in the 75mm gun -- a model in itself -- will be hidden from view if the fuselage is completely closed up. Several of Kancho's construction photos (in the kit and on his web site) suggest building the model with open access panels in order to let the viewer take note of your handiwork. This looks like a great option to exercise.
First Impressions: Kancho keeps turning out kits of the rare and unusual, of which the Hs-129 is a perfect example. The B3 variant could have been one of the most deadly ground attack planes of the war but for the fact that its weight left it critically flawed in terms of performance. The kit is well designed, and has lots of potential for display in a diorama setting. It's not a beginner's kit, however. The number of parts crammed into what is actually a pretty small model (roughly 11 inch wingspan and 8 inch fuselage), along with the size of those parts, leads me to classify it as intermediate, if not "advanced intermediate." It looks like a lot of fun for those who take it on.
Bill Geoghegan
|
Bell XP-77 |
||
 |
Description: | Experimental light point defense fighter (U.S., WW II) |
| Kit: | Kampfflieger "Rare Pearls" Bell XP-77 | |
| Scale: | 1:48 | |
| Designer: | Roman Vasyliev | |
| Format: | Downloadable PDF file of about 700 kb. The download consists of one page of background and specifications, one page of 3-D construction drawings, and one page of parts all in A4 format. | |
| Parts: | 92 | |
| Difficulty: | Beginner to advanced beginner depending on options selected | |
Kit: This is a sweet little plane! It looks like the kind of slightly retro aircraft you might find at an EAA meet somewhere. In real life, however, it was the product of an effort build a small, lightweight point defense fighter using non-strategic materials -- which in this case meant plywood. By the time it first flew in 1944, concerns over the availability of aluminum had faded into the background, and the need for a light fight of the type had disappeared. As Roman points out in his notes, only two were built; and of those, one crashed, and the other disappeared into history. As with other kits from Roman Vasilyev, the surface detail on the aircraft is beautifully done. Panel lines are thin and gray and have been given a slightly 3-D appearance, all of which cuts down on their non-scale obviousness. The kit comes with a basic cockpit (instrument panel, floor, rudder pedals, control stick, seat and harness) and 3-dimensional wheel wells.
Construction: Construction is very straightforward.
Fuselage and wing formers that need cardboard backing are clearly
marked in red. Parts that would benefit from wire reinforcement (such
as LG struts) are not marked, but it should be obvious where this would
help. The wheels are laminated from five layers of card stock, but
would probably benefit from one or two cardboard backing layers to give
them a little additional thickness. I would also recommend using
either your own gluing strips to attach fuselage sections, or creating
additional formers to allow for butt-joining of fuselage segments.
Otherwise, the model looks like a fairly easy build. You do have
the option of skipping the cockpit and using an opaque canopy if you
prefer.
First
Impressions: This will build up into a very attractive
little model. It's small, simple, and has a remarkably clean
design. It's unusual enough that you might even want to sneak it
into your local IPMS meet.... As far as difficulty is
concerned, I'd almost put it at the beginner level, especially if the
cockpit interior and clear glazing were avoided. Given small
parts and requirements for very careful positioning of
some components, I'll say "beginner" to "advanced beginner" for a
rating. But even if you're a beginner, give it a go. A very
nice offering from Roman Vasyliev, and aptly included in the "Rare
Pearls" series.
Bill Geoghegan
|
Gloster Meteor F.1 |
||
 |
Description: | First operational jet fighter to see action with the Allies in WW II (UK) |
| Kit: | Paper-AircraftWerks Gloster Meteor F.1 | |
| Scale: | 1:32 | |
| Designer: | Gee Chen | |
| Format: | 15 downloadable PDF files totalling about 950 kb. The download consists of a cover page with building tips, 6 pages of detailed construction drawings and instructions and 8 pages of parts, all in letter format (8½" by 11"). All instructions are in French and English. | |
| Parts: | 163 | |
| Difficulty: | Advanced beginner | |
Kit: This classic jet fighter comes to us from a new designer, Gee Chen, who hails from Québec in Canada. It's an ambitious first project -- a detailed rendering of a WW II twin-jet fighter in 1:32 scale. The model comes with a detailed cockpit rendered with a combination of 3D and printed detail, fully detailed wheel wells, and an intricate landing gear assembly. The surface detail and coloring are very nicely done. Panel lines are unobtrusive, and there is not an excess of rivet detail. There is no attempt at weathering.
The design looks very well thought-out from a construction standpoint. Gee Chen has done a superb job with the instructions and construction drawings. Drawings cover every step of the process, and there are numerous hints, as well as cautions to steer the builder away from potential trouble. Parts are clearly numbered, and there are frequent cross-references to other construction steps where needed subassemblies are put together. He has also included a nice gallery of photos on his web site.
Construction: Construction is very straightforward. Fuselage and wing formers that need cardboard backing are clearly called out in the instructions. Parts that would benefit from wire reinforcement (such as LG struts) are are clearly identified. Wheels are laminated from card stock, and the drawings include pictures and measurements to help the builder get the correct scale thickness (frequently a problem with built-up wheels, I've found). The fuselage follows the fairly common butt-joint method, in which fuselage sections are constructed with a former in each end. Segments are then glued together to product the final assembly. My only caution would be to insure that each former is absolutely flush with the section skin before gluing sections together. That's the only way to get a "seamless" fuselage.
The cockpit canopy can be completed in either an opaque version (which means you don't have to do the cockpit detail), or a transparent version. Good instructions are provided to help you with the latter. Given the number of layers involved (glazing plus internal and external framing), I'd suggest using plain bond paper for printing the canopy framing.
First Impressions: Gee Chen's Meteor should build up into a very attractive model of a classic WWII and Korean War aircraft. There are plenty of opportunities for interior and external detailing, including additional cockpit detail, and external weathering. As far as difficulty is concerned, I'd put it at the advanced beginner level.
Bill Geoghegan