First Looks For the Month of September 2003
| F-16C Falcon | Published by P-Model |
| Designer: | K. Gondou |
| Description: | USAF Fighter Bomber |

Kit: A 1/50 scale kit that is delivered over the internet from Japan. The model comes on 12 sheets of A4 paper (11.69 by 8.28 inch) so you will need legal size card stock/paper (14 by 8 1/2 inch) to print the model out on and maintain the 1/50 scale. The model is sent in PDF format so you will need Adobe Reader and a color printer to print the model out . The 12 pages in the kit consist of five pages of instructions and seven pages of colored card stock that contain the parts to build the model. The instructions are in Japanese but 24 detailed diagrams that will lead you step by step through construction of the model. Connectors on all parts of the model are part of each part but on this model there is a set of connectors that can be glued to each section for a smoother fit. No cockpit is provided and the canopy is of colored card stock. Detailed landing gear and wheel wells are provided. Included with the kit are two AIM-7 Sparrows, two AIM-9 Sidewinders and two AIM120 AMRAAM missiles.
Construction: Each fuselage section on all the P Models I have seen have the connection tabs on the fuselage section themselves the same as Fiddlers Green. In this model they have given you a set of connector strips. This means that you can cut the connectors of each section, glue the connector strips on the section which will give you a much smoother fuselage when finished. Decide on which method you want to use and build the fuselage following the step by step diagrams provided. The wings are not a separate build, you will attach the wing sections about one half way down the fuselage and then continue to build the fuselage after this. As you proceed down the fuselage you will build the wheel wells. Just make sure that you follow the diagrams and everything will be okay. The tail section is built as an integral part of the fuselage . Decide if you want to put the fuel tanks and which missiles are to be attached. Build and attach them to the appropriate position. You are given a choice of two ways to build your wheels either as a continuous strip or hollow inside. Build the wheels and landing gear and attach to the aircraft.
First Impressions: As you can see from the pictures above, this kit makes into a very nice model. It is not a kit for a beginner though. The instructions are in Japanese and the diagrams sometime can be a little confusing.
| Morane Saulnier AI | Published by DeWayne Barnett |
| Designer: | Marek Pacynski |
| Description: | WWI Monoplane Fighter |

Kit: A 1/33 scale model of a WWI fighter just released by Dewayne Barnett. This is the latest model by Marek Pacynski in this scale and is up to his typical high quality. The model is available on DeWayne's web site as an electronic download. Remember that you will need Adobe Reader and a color printer to print the model out. The model comes on seven sheets of A4 paper/card stock, 11.69 by 8.28 inch, so you will need legal size card stock in order to print the model out and keep it in scale. There is a cover sheet, a sheet of history and specifications, two sheets of diagrams and three sheets of parts to build the model. Model contains a detailed cockpit, engine and machine guns. Landing gear is provided and since the aircraft has fixed landing gear there are no wheel wells.
Construction: Construction of the fuselage is
of the "butt and glue" method. You cut out each fuselage section and roll and
glue it together, then cut a reinforced former out and glue a former into each
end. When you have constructed all the fuselage section you glue them together
by gluing the formers to each other. Before starting
on the fuselage you should build the cockpit and engine so that you can insert
them into the fuselage section they belong in before gluing the frames in. Cut
and reinforce the wing frames and struts. Build the wings with the reinforced
frames inside and attach the wing to the top of the aircraft using the struts.
Build the landing gear, machine guns, propellers and tail section and glue to
the proper place on the aircraft. Using black thread and the diagrams provided,
glue the thread to the struts and wings to simulate the flying wires of the
aircraft.
First Impressions: Marek designs models that are
not normally seen in any media type. Here is one that I have never seen before
and will be a great addition to your WWI collection. Not for a beginner, WWI
models with all their strutting does take a little experience before you attempt
this type of models.
| Windjammer | Published by Maza Modelesana |
| Description: | Sailing Ship |
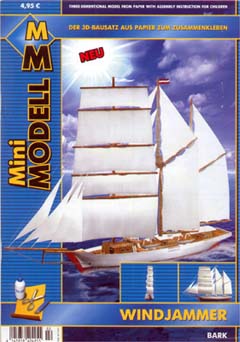
Kit: A new series of models from Latvia sent to me by Peter Heesch of H&B; Precision Models. This company has "Three-Dementional Model From Paper With Assembly Instructions for Children" on the cover. Looking at the kit I would agree but would also add that this line would be great for the beginner in the hobby. The model comes in a booklet form that contains 12 sheets of card stock The inside of the front and back cover has a set of step by step instructions and there are several views of the completed model on the back cover with the parts marked. The parts of the model are all large which will make it easy for young children to build the model and easier for the beginner to gain experience in building card models. Even with all this the model is well printed with a lot of detail and will make up into a nice looking model.
Construction: First thing to do is to cut all the hull formers out and glue them to a heavier card stock. When you have done this then glue the formers together, this will give your ship the proper shape and the strength for the rest of the model. Glue the bottom sections of the hull onto the formers. Glue the decks to a heavier card stock and then glue them to the top of the hull formers. Cut out the hull sides and glue between the bottom hull pieces and the deck. Build the superstructure and glue to the deck, then build the bowsprit and glue to the front of the ship. Build the masts for the ship and then decide if you want to display the ship with sails. The kit comes with a full set of sails and if you want to display the ship with them cut them out and glue to the masts. Using black thread, rig the ship using the rigging diagram on the inside back cover. A nice little display stand is provide for you to set your model on for a great little display.
First Impressions: A simple little ship with large
parts for easy building. A great little model for those who want to learn how
to build card model ships. All the techniques you need for building more complicated
ships are right here. Even as simple as the model is you will be proud to display
your handiwork when done.
| HMS Sheffield | Published by Modelik |
| Designer: | Dmitri Hotkins - Rosa |
| Description: | British WWII Light Cruiser |
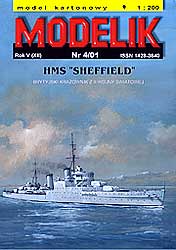
Kit: This 1/200 kit comes in an A3 booklet that contains 12 pages. There are three and one half pages of formers printed on regular paper that are to be glued to a heavier card stock. Seven and a half sheets of card stock contain all the parts needed to build the ship . One and a half sheets along with the inside of the back cover contain detailed diagrams on how to build the ship. The inside of the front cover contains a history of the ship and building instructions in Polish. Parts are provided so that the ship can be built as a full hull or if you so choose you can build your ship as a waterline model. Propellers, shafts and a rudder are provided if you want to build your model as a full hull version. One Walrus catapult aircraft is provided in the kit.
Construction: Step one in building the ship is too cut out all the parts that are on regular paper and glue them to a heavier card stock. You will use these parts to build the frame of the ship. You must at this point decide if you want a waterline or full hull version. If you want a waterline version you cut off the parts of each former that would be below the water line. I build waterline models and spot glue the base to a piece of wood to insure that I do not get any warping. After getting the base solid then glue the vertical and horizontal formers to the base. Cut the deck out and glue to a heavier card stock, when finished glue to the top of the horizontal and vertical frames. At this point I remove the hull from the piece of wood I spot glued it to. Cut the hull sides out and glue between the base and deck. Build the superstructure up on the deck and then start building the guns. Build the main battery , secondary battery, anti-aircraft guns and torpedo tubes and glue to the proper place on the deck. Build your cranes, funnels, lifeboats and other deck parts and glue to the deck. There is a page, 6, which shows all the masts in 1:1 scale, I would suggest you use thin dowel or wire to build these.
First Impressions: Printing and colors are nice
and sharp on this model. It seems to be of moderate difficulty and though I
would not recommend it for a beginner, anyone with a little card modeling experience
should be able to turn out a model that they will be proud of.
| P-39N Airacobra | Published by Halinski |
| Designer: | Marcin Grygiel |
| Description: | USAAC WWII Fighter |

Kit: This 1/33 scale kit comes in a booklet form that is somewhat larger than A4. Halinski releases all of their models in this odd size. The booklet contains six pages and this includes the back cover as parts are on this page. The inside front cover contains a history of the aircraft and instructions on how to build the kit, both in Polish. There are two pages, printed on both sides, that contain detailed diagrams. Two pages of formers on regular paper which are to be glued to a heavier card stock are in the booklet. The parts to build the model are contained on three pages of card stock. The model contains a very detailed cockpit , wheel wells and landing gear. No card stock canopy is provided, a template is provided so you can use transparent material to make the canopy. This model contains markings of a P-39 that was supplied to the Soviet Union during the Second World War.
Construction: Cut all the parts out of the plain paper pages and glue then to a heavier card stock. These parts will be used as internal formers through the model to give it the proper shape and provide strength for your model. As with most Halinski models you will start building the fuselage by building a central frame which will contain the cockpit. Once you have built the cockpit then you will cut the fuselage skin out and glue over the frame. All sections of the skin are connected to each other with connector strips. The rest of the fuselage is built with connector strips and a former in one end which is connected to the next section. Build the frames for the wings and tail section and then glue the skins for these over the frames. Before you do this on the wings build the wheel wells inside the wing. Build the landing gear, wheels and propeller and glue to the proper place on the model.
First Impressions: Another top notch model by
Halinski. As on every Halinski I have built or looked at the detail is truly
amazing. This is not a model for a beginner, in order to do justice to the detailing
of this model you need to have card modeling experience before attempting the
model.
| Krab | Published by Modelik |
| Designer: | Waldemar Rychard |
| Description: | Russian 155mm Self Propelled Howitzer |

Kit: A 1/25 scale vehicle that comes in booklet form. The booklet contains 16 A3 pages. Five of these pages are on regular paper which are to be glued to a heavier card stock. Eight of the pages are on card stock which contain all the parts to build the model. Three pages of detailed diagrams are provided and there is a four view of the completed vehicle part of which appears on the inside back cover. The inside of the front cover contains a history of the vehicle along with the building instructions which are in Polish. The model has a very detailed outside but there is no interior . Parts are provided so that you can have the guns rotate and elevate. Printing and coloring are very sharp .
Construction: Cut all the parts out from the regular paper and glue to a heavier card stock. These will now become the internal frames for both the hull and turret. Start by building the hull, glue all the formers that you just reinforced for the hull. Once the formers are glued together then cut the covering for the hull and glue over the formers. Cut out and build all the parts for the suspension and bogies, glue them together and glue to the bottom of the hull. Build the tracks and glue them around the bogies. Before you build the turret you will want to build the main gun so that you can have it elevate once it has been installed. Glue the internal formers for the turret and then install the main gun, if you want it to elevate do not glue the gun in place. Cut the skins out for the turret and glue over the formers. If you want the turret to rotate place it in the hull if you do not want it to do so then glue it in place. Build the machine gun and mount and place on the top of the turret. Again if you want the machine gun to elevate and rotate do not glue. Finish your model by adding all the detail that is available.
First Impressions: A very nice and unusual model
that will enhance any collection of vehicles. The model is not difficult to
build but as in all tracked models the bogies and tracks do take some patience
to complete.
| Vickers Vimy | Published by Fly Model/Gomix |
| Designer: | Grzegorz Swierczewski |
| Description: | WWI Twin Engine Bomber |
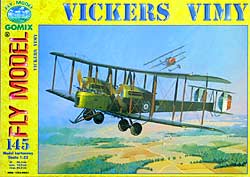
Kit: A 1/33 scale model that comes in booklet form that contains eight sheets of A3 paper and card stock. The instructions are in Polish but there are two sheets, printed on both sides, of detailed diagrams which will help the non Polish reader in construction of the model. The model itself comes on six sheets of colored card stock. A detailed cockpit and landing gear is provided, of course this aircraft did not have a canopy and the landing gear is fixed so there are no wheel wells. Forward and aft machine gunner positions are provided with machine gun mounts. Bombs and bomb racks for under fuselage and under wing mounts are provided. Gomix has provided a sheet of transparent material in the kit for you to make the wind screens.
Construction: Cut out all the parts marked with an * and glue to a heavier card stock. Cut out all the interior and exterior fuselage parts. Glue the interior parts inside the exterior parts making sure the printed parts are reversed so you can see the printing inside the finished fuselage. Build the cockpit and gun positions and insert inside the forward section of the fuselage. Once completed glue all the fuselage sections together. Cut all the struts and landing gear parts out, I would recommend that you use toothpicks or a piece of wire inside the struts for strength. Glue the wing and tail struts to the fuselage where indicated in the diagrams. Build the tail section and mount between the fuselage and struts. Glue the landing gear struts to the fuselage, then build the wheels and glue to the struts. Using the reinforced wing parts build the frame and when finished glue the wing skins over the frame. Glue the bottom wing to the fuselage and then glue the struts to the wing. When finished glue the top wing to the struts that are on the fuselage and bottom wing. Finish your model by building the machine guns and propellers and mounting them to the proper positions.
First Impressions: A very nice looking kit, printing
and coloring are clear and sharp. A welcome addition to anyone's WWI collection.
Does not appear to be too difficult to build but be aware that "strutting" a
biplane can be tricky. Because of this I would not recommend this as your first
model.
| Ford T | Published by Super Model |
| Designer: | Marian I Jaroslaw Sobel |
| Description: | Early Ford Automobile |

Kit: A 1/25 scale vehicle that comes in a 9 x 12.5 inch booklet. There are two pages of card stock inside the booklet. These two pages along with the back cover contain the parts to build the model. History and instruction, in Polish, are on the back cover along with several pictures of the completed model. The inside cover has a set of detailed diagrams which will help anyone, no matter what language, build the model. This is a very detailed model, it contains the engine radiator and complete set of controls for the car. The model is done in black, as the real car was, except for the radiator and some parts that were bare metal or wood.
Construction: Start construction by building the frame. There is no indication but I assume that the parts marked with a "*" are to be glued to a heavier card stock. Watch carefully as there are some marked "**" which means two layers of reinforcing. After finishing the frame build the engine and radiator and glue to the frame. Now build the axles, suspension and wheels, assemble them all together and glue to the bottom of the frame. Cut out the firewall and glue it behind the engine and then build and install all the controls inside the cab of the car. Build the front and rear seats along with the other body parts and install them on the frame. Using the diagram on the inside of the back page, cut and shape pieces of wire that will hold the roof of the car. Attach these to the body of the car and then glue the frame over the wires.
First Impressions: A very neat looking model.
There are many small parts so a steady hand will be needed to build. There appears
a lot of room for detailing. One thing that comes to mind is building the spoked
wheels. There was a great article on this in one of the issues of the magazine
and this will really spiff the model up.
| Cap Arcona | Published by HMV |
| Designer: | Peter Brandt |
| Description: | German Fast Liner |

Kit: As with the HMV Bismarck that I reviewed last month I say WOW! again. This has to be one of the most detailed card model that I have ever seen. It comes in a book, not a booklet, that contains 44 pages of card stock. The instructions and history are in German but there are 36 pages of detailed diagrams that lead you step by step through the construction of the model. The book has a page that shows four photo etched sheets that are available for the model. The model can be built either as a full hull ship or a water line model . Detailing on this model is down to the tables and chairs in the dining rooms and lounges. The printing and coloring of the kit is just outstanding.
Construction: Even with all the detail the construction of the model is much the same as I have seen for most card model ships. The first thing that you are going to do is to build the frame for the hull. I suggest spot gluing the base to a piece of wood to insure that you get no warping as you glue the formers together. Cut all the formers out and glue them to a heavier card stock to insure you have the strength needed to keep the shape of the basic ship. Glue all the vertical and horizontal formers to the base. Reinforce the deck parts before gluing to the frame and when finished glue the sides of the hull between the base and deck. At this point remove the hull from the piece of wood and add the lower hull if you want a full hull model. Start on the superstructure making sure that you do the detailing as you proceed. You will have to build all the little tables, chairs, the piano and other pieces in the dinning room and lounges before putting the roof on these rooms. After finishing the superstructure start detailing the decks and outside of the superstructure. Finally build the anchors, masts, lifeboats and other details and glue them to their proper places on the decks and superstructure.
First Impressions: A very impressive model that will be the prize of your collection. This is not a model for the beginner and make sure that you have the time to build this model before starting.
| Mig 29 | Published by Maly Modelarz |
| Designer: | Roman Staszalek |
| Description: | Russian Modern Fighter |

Kit: A 1/33 scale kit that comes in booklet form. The booklet contains 10 pages of A4 paper and card stock. Eight of the pages are card stock that contain the parts to build the model. One page of the paper contains the formers which are to be glued to a heavier card stock which will be used for reinforcement. The other page contains a three view on one side, wire templates and instructions on the other side. The instructions are in Polish but there are diagrams on the inside of the front and back cover to help non-Polish readers assemble the model. The model contains a detailed cockpit . A colored card canopy is provided if you do not want to detail the cockpit. If you do then you can use the card canopy as a template to scratch build a clear canopy. Markings on the model are for the Polish Air Force.
Construction: Construction of the fuselage is in two phases. The forward part is built using the "butt and glue" method but the middle and rear are a type of "egg crate" that is commonly used in ship building. First thing to do is to cut out all the internal formers and reinforce them. Then build the forward fuselage sections and butt glue them together. If you want to delay the cockpit you will do this in the indicated forward fuselage section. Now build the frame for the middle and rear fuselage section and then cut and glue the fuselage skin over the frame. Glue the forward fuselage section to the front of the frame. Glue the frames for the tail sections and wings to the fuselage frame and then glue the wing and tail skins over the frames. There are no wheel wells on the model, they are simulated by black areas on the bottom of the fuselage. Build the landing gear and glue them to the black areas. If you do not want to display the cockpit then glue the card canopy to the fuselage. If you want to display the cockpit then use some type of transparent material to replace the blue parts of the card canopy. Glue the transparent material to the card frame and then the completed canopy to the fuselage.
First Impressions: A nice looking model. One of the advantages of Maly models is that it can be built at several different levels of difficulty. For the beginner you can build the model with the card canopy and without landing gear. For the more experienced, you can detail the cockpit and build a clear canopy.
| EM-10 with 111A & 112A | Published by Kartonowego Fana |
| Designer: | Grzegorz Molenda |
| Description: | Electric Locomotive with two cars |

Kit: This is a 1/87 (HO) scale kit of a Polish Electric Locomotive with two passenger cars. The model comes in a booklet that contains six pages of A3 card stock. Instructions are on the back of the front cover in Polish. There are a set of detailed diagrams on the inside of the front and back covers so that even non-Polish readers will have no problems in building the model. The model contains a detailed cab for the engine, detailed suspension and wheels for all sections .There is no interior for the wagons, the windows are colored on the sides of the cars.
Construction: The first thing to do is to cut out all the parts with a * after the number and reinforce these pieces with a heavier card stock. Use these reinforced parts to build the interior of all three parts of the model. Build the frame and suspensions for all three parts. Then build the wheels and glue the wheels and suspension on to the bottom of the frame. Add the additional detailing to the bottom of the frame and then start building the upper sections. Start with the engine first, building the interior of the cab and then the outside. Glue to the upper part of the frame and then glue the front and back part of the engine over the frames. Both cars are built the same, they consist of the ends and one piece that makes up the top and sides. Glue these three parts over the frames that you have previously constructed. You can now connect the engine up to the two cars and display your model.
First Impressions: A very colorful model that
will fit in with any HO collection. It might be fun to buy some HO track and
display the model on the track. Not too difficult of a model to build some careful
cutting on the suspension and wheels is required.
| He 100 D1 | Published by GreMir Models |
| Designer: | Rafal Ciesielski |
| Description: | German WWII Fighter |

Kit: This 1/33 kit is supplied on a CD which means that you will need a supply of card stock, 8 /12 x 11 inch, and a color printer. The model has its own DataViewer which allows you to see all the parts of the model. You must also print the model out through this DataViewer which means that you do not need any external print program. The CD contains the following pages: a cover sheet, three sheets of instructions in English, four pages of diagrams and four pages of photos. The Model itself comes on four sheets of card stock and one page that is supposed to be printed out on regular paper. Also included are two bonus sheets of card stock which will allow you to build a second version of the model. Being on a CD there is no reason that you could not build both versions if you want. Parts are provided to build a detailed cockpit but if you do not want to do the detailing a colored card stock canopy is provided. Wheel wells and detailed landing gear are also provided.
Construction: Before starting construction glue all the parts on the plain sheet of paper on to a heavier card stock. These reinforced formers will become the internal structure for the model and are necessary for strength. Then build the detailed cockpit if you intend to make a clear canopy so it can be seen. The fuselage is built using the butt and glue method. Here you build each fuselage section and insert a former in each end. When all the sections are built you then glue the sections together. As you build the sections make sure that you install the cockpit, if you are going to build it, and install it in the correct fuselage section. Also make sure that you install the tail wheel and associated parts in the appropriate section. Build the frame for the wings. Build and install the main landing gear wheel wells and insert inside the frame. Then cut fold and glue the wing skins around the frame and glue the wings to the fuselage. Build the tail frame on the rear of the fuselage and glue the tail skins around the frame. Build the propeller, spinner and landing gear and glue to the appropriate position on the model. Using transparent material build the canopy, if you do not want to do this you can use the card stock canopy, and glue the canopy over the cockpit.
First Impressions: A great addition to
the 1/33 scale line that has been previously missing. Not a difficult model
to build but I would recommend that you have some experience in building card
aircraft, particularly those with formers, before building this model.
| Ju 88 | Published by Cardmodelers.net |
| Designer: | Emil Zarkov |
| Description: | German WWII Bomber |

Kit: Cardmodels.net is now releasing this model on CD or by E-mail. The kit will contain the following sheets: eight instruction sheets, three sheets to be glued to a heavy card stock and 17 parts sheets. One of the sheets contains all the transparencies. This sheet can be printed out on transparent material or used as templates to cut them out. All sheets are in PDF format and the CD does contain Adobe reader so all you will need is a color printer and the proper weight card stock. The sheets are in A4 format, 11.69 by 8.28 inch, so you will need larger than normal card stock or the model will not print out in scale. Instructions in a ModelArt model are a step by step set of diagrams that lead you through the construction of the model. This is a great idea because it does not matter what language you read. The model is designed so that you can build it in different levels of expertise. Detailed cockpits and interior as well are provided but if you do want to do this much detailing, colored card stock canopies are provided. Also Emil has provided a tail without the Swastika for those who find this symbol offensive.
Construction: Construction of the fuselage is of the former connecting strip method. In this method you glue a connecting strip in one end of the fuselage section and then a former in the same end. When all fuselage sections are completed they are glued together using the connecting strip to finish the fuselage. Before you start on the fuselage determine if you want to have transparent canopies. If so than build the interior and cockpit of the aircraft before continuing. As you build each fuselage section make sure that you put the interior parts before gluing the sections together. After finishing the fuselage, start on the wings by building the frames. After the frames are finished you can now cut and glue the wing skins over the frame. Now do the same for the tail section. Start building the engine nacelles making sure that you build the wheel wells inside before putting the skins over the nacelles. You do not have to do this as you can leave the wheel well doors closed and not bother with building the wheel wells or the landing gear. If you have decided to display your model with gear down, build the landing gear and glue into the wheel wells. Now finish your model by building the propellers, bombs and bomb racks.
First Impressions: Another great model by Emil
Zarkov, I particularly like the idea of the different levels of difficulty that
are provided. This kit is making the process as simple as possible by having
a main page that directs you to all the pages in the kit. Even with the different
levels of difficulty this is still not a model for a beginner.
| Fokker DVI | Published by DeWayne Barnett |
| Designer: | Marek Pacynski |
| Description: | German WWI Fighter |

Kit: Another fine 1/50 scale kit from Marek. This aircraft represents one that I have never seen before. The Model is delivered across the Internet in PDF format. You will need Adobe Reader and a color printer to print the model out on. The model comes on two sheets of card stock, the first contains a history of the aircraft and detailed construction drawings. The second sheet contains all of the parts needed to build the model. All parts to be glued to a heavier card stock are marked in red. The kit contains a detailed cockpit, engine and machine guns. The lozenge color scheme on this model is absolutely great.
Construction: First thing to do is cut all the parts out that are marked in red and then glue them to a heavier card stock. The fuselage is built using three parts. One part contains both sides and the front top part and then there is the rear top part and bottom section. Cut and bend the part that contains the two sides out and then glue the connecting strips to the bottom. Bend the top and bottom tabs and glue the top and bottom sections. Glue the tail sections over the reinforced formers and then glue to the rear of the fuselage. Slide the former through the bottom of the fuselage and glue the bottom wing to the former. Cut out all the struts, I recommend that you glue a piece of wire or toothpick inside the struts for strength, and glue to the fuselage and bottom wing. Glue the top wing around the former and then to the struts. Build the engine and glue to the front of the aircraft and then build the cowling around the engine. Finish up by building the machine gun and landing gear and gluing to the proper position on the model.
First Impressions: A very nice looking model that is not too difficult to build. As with any biplane the strutting of the wings and landing gear is the hard part of building the model. Patience and a steady hand are required for these.
This column does not cover all the new card model aircraft and ships that have been released this month. It contains only those models that have been sent to me by dealers and designers for review or that I have purchased for review. Due to space restrictions, some models sent in for review may be held over until next month.
Thanks to the following for providing kits for inspection and review:
