Photos by the author 
Last month we covered the main subassemblies of the model,
as it had already reached this stage during a building phase abandoned eight
years ago. This month the subassemblies have been cleaned, repaired where possible
and assembled. Not ideal circumstances for a review, so some allowances will
be made!
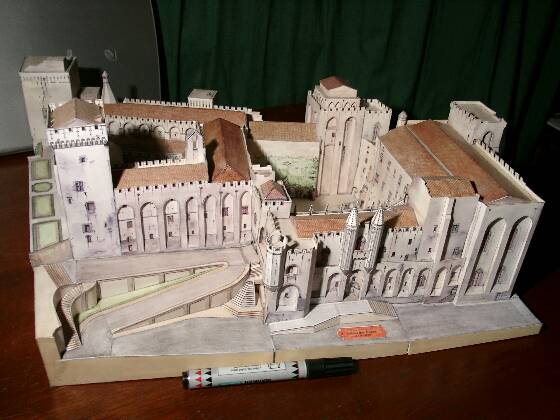
Model shown here with a 6" marker for scale.


Here we see the model's "north" end, including gardens and arcading along
the north hall outer wall. This arcading is very nicely represented in 3d on
most wall surfaces. This requires a lot of work as previously noted. It's a
lot of fun also, however, the results being very satisfying.

Here we see the north-east tower. This has suffered some damage during
moves, unfortunately. The arch visible at the lower left is provided with an
interior surface, however, this has been poorly fitted and should look better.
Other arches i.e. the belltower also have these interior surfaces but it is
possible to miss this during construction as most items are assembled in numerical
sequence rather than diagrammed. Take care!

A closeup of the east range. Gardens along this side are simply but attractively
represented. Joints between 'landscape' sections are one of the kit's weak points
- many are tab joints but not connected to a former, hence can be weak and liable
to catch and tear during construction. They also require serious clamping during
gluing.

This is an overall view of the model's 'east' side. The model is over 50
cm or 20" long.

The southeast corner in closeup.
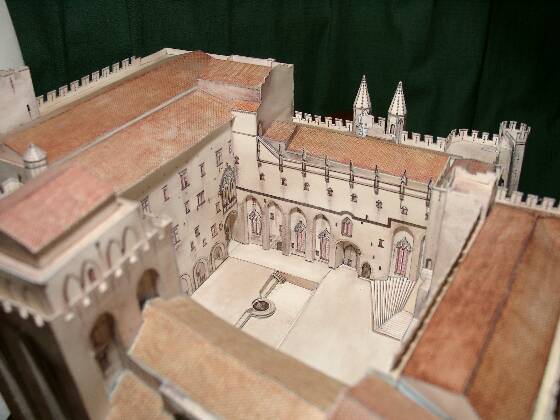
A view into the main courtyard. All care should be taken to avoid warps
in this area, as it is critical to the overall straightness of the model.

The main courtyard looking 'north'. The author's model has some serious
warps, partly owing to the long delay in completion, partly to the author's lack
of experience as this was my first serious paper model. It's possible there are
some outright parts fit issues too! However it would not be fair to state this
as fact, owing to the above factors.

A pair of views of the northern courtyard or cloister. The artwork of this
kit, as with most L'Instant Durable models, is extremely detailed and subtle
and incorporates beautiful weathering and ivy overgrowth etc.


The outer wall of the model from the 'south'. (A few small parts have gone
missing. There's nothing for it - I have to build this kit again!)

An overall view from the same angle.

Here's the underside of the model, showing why it's not recommended for
beginners!
Well, there's still a few jobs to do - some tears and poor joints still need
fixing, a few small parts have to be tracked down, and the model requires a
coat of varnish of some sort to protect it for 'posterity', ahem ahem. But all
in all, it's done - perhaps my slowest build ever! All in all, this is a kit
for serious fans of mediaeval architecture and not one I would recommend to
a beginner. I completed most of it as my first effort at 'real' paper modelling
and this was probably the reason that I took eight years to finish it! However,
as mentioned last month, there's no real reason it could not be completed by
anyone with a modicum of skill and patience. It would pay to examine the parts
and numbering sequence more carefully than I did - I ended up with several 'extra'
parts and had to find where they went! The lack of diagrams is a factor here
- some items are non-obvious and I'd really like a few more drawings.
The structure is a complex series of interconnecting boxes with many small details,
and some areas could use some extra structure - since the card is fairly thin
and some areas are not well reinforced, it is easy to build some serious warps
into the model, which I duly did - some extra formers would have been welcome.
Also, the use of white areas to indicate the attachment points for parts could
be improved - use of a paler shade of the surrounding colour would improve the
appearance resulting from poorly-fitted parts and is something more and more
designers are doing these days. Still, the artwork is absolutely beautiful and
despite my poor construction the final model is a really attractive item. If
you have yuppie tendencies, it's the sort of thing that tempts you to build
a glass coffee table around it! If you attempt this kit, I would recommend reinforcing
many of the outer 'landscape' section joints and using some extra formers here
and there. Build in smaller subassemblies ensuring that they are ABSOLUTELY
straight in all details. Assemble the subassemblies around the courtyards, and
you should find all is well. In summary, a fabulous kit of a fabulous building
and a kit which will attract dust like few others - well worth the money though!
As previously noted, your friends will go "oooh!". Trust me on this.
Summary:
| Model: |
Palais des Papes, Avignon |
| Kit: |
L'Instant Durable |
| Designers: |
J.T Roquebert, G. Gros, S. Gagniere |
| Availability: |
|
| Scale: |
1:300 |
| Difficulty: |
Not easy |
| Number of Parts: |
~ 250 |
| Instructions: |
Multilingual Instructions |
| Diagrams: |
Several diagrams |
| Fit: |
Good |
| Coloring and Artwork: |
Excellent |
| Printing: |
Excellent |
| Resources: |
http://www.palais-des-papes.com
|
| Contact/Question |
nipngnwm@q-net.net.au |
