First Looks For the Month of January 2003
| F7U-3 Cutlass | Published by Wilhemshaven |
| Description: | U.S. Navy Jet Interceptor |

Kit: A 1/50 scale kit that was first published in the late 50's on A2 card stock. It has not been available for about 40 years, but was re-published on A3 stock a few years ago. The model now comes on four sheets of card stock. Two sheets are colored and the other two are in black and white. The colored pages contain the exterior of the aircraft. The black and white sheets contain the formers and some very detailed diagrams of the model. The model comes with four sheets of instructions in English. As do most of Wilhelmshavener models, this model does not come with a cockpit or wheel wells. The canopy is printed on colored card stock and the wheel wells are colored on the bottom of the fuselage and tail. Model comes with four missiles to go under the wings.
Construction: This model uses the former and connecting strip method for building the fuselage. The first thing you want to do is take all the formers and glue them to a .5 - .8 mm card stock for reinforcement. Now cut and form the fuselage sections, glue the connecting strips into the indicated end and then glue the reinforced formers into the same end as the connecting strip. When you have finished, glue all the sections together using the connecting strips. Build and glue the engines into the rear of the fuselage and the cockpit on top. Cut and build the wing formers, do not reinforce, and glue to the fuselage. Cut fold and glue the tail sections together, then glue to the wings. Once you have the tail sections attached, you can then go ahead and build the landing gear and wheels. Build the four missiles and gun pod and glue to the bottom of the model.
First Impressions: One of the complex Wilhelmshavener models. Their models fall into two catagories, the very simple and the complex. Their complex models are some of the best 1/50 scale models available.
| HMS Invincible | Published by JSC |
| Designer: | Martin Katny |
| Description: | British Aircraft Carrier |

Kit: A 1/400 scale model printed on A4 paper compiled in a booklet. The booklet contains 12 sheets of card stock with two of them being printed on both sides. Four sheets of history and instructions in Polish and two sheets of diagrams. The model I received was from H&B; Precision Models here in the US and had three sheets with the instructions translated into English. This may not be the case if you buy the model elsewhere. The four cover sheets contain some very nice detailed pictures of the actual ship. The model comes with three aircraft tugs, a flight deck crane, 12 Westland Sea King AEW helocopters and eight British Aerospace Sea Harrier FA2. The ship is designed so that the hangar deck is visible.
Construction: Cut out the four parts that make the flight deck, two top and two bottom. If you are going to make movable elevators cut the elevators out. Glue the parts together to make the deck. Now cut the hangar deck section out glue so that the grey part is inwards. Reinforce all the internal formers and then cut and glue to the indicated positions inside the hangar deck and hull. Glue parts inside the hangar deck and when finished cut and glue the hull sides around the flight and hangar deck. Build the superstructure , funnels, masts, guns and other accessories to go on the flight deck and superstructure. Now decide which aircraft and vechiles that you want to put on the deck and build those.
First Impressions: The ship is does not appear to be that difficult to build. It will take some time because of the number of parts included in the model. Because of the size of the vehicles and aircraft good motor skills will be required to build these. I would not recommend this model to a beginner.
| XJR-11 | Published by Prototyp |
| Description: | XJR-11 Prototype Easy Version |

Kit: This kit was delivered to me on five sheets. There is one sheet of card stock which has the introduction on one side and diagrams on the other. Two sheet of regular paper which has the internal parts and wheels. There are no instructions but I assume that these sheets would be glued to a heavier card stock to give the structure support. The other two sheets are printed on glossy paper and contains the exterior of the vehicle. The model looks detailed to me but since it is labeled the "Easy Version", I am assuming that there is a more detailed version available.
Construction: I have two problems with doing this portion of the review. First I am not a vehicle builder so have no experience in building this type model. The other is the lack of instructions. All I can do is look at the diagrams and pass on my impressions of what I would do if I built the model. First thing I would do is to take both pieces of the plain paper and glue them to .5 to .8 mm card stock. After they were dry I would cut them out and use them to build internal structure of the vehicle. I would then cut the parts out of the glossy paper and build the cockpit, hood, the interior and exterior of the car. When doing this I would only glue to the inside of the glossy paper. I have found that the water base glues I use does not stick to glossy paper very well.
First Impressions: The model appears as if it would make a nice looking model and I would like to see someone build it and do a build and review. The model does not look that difficult to build but because of the lack of instructions would not recommend it unless you have card modeling experience.
| Pfalz D.IIIa | Published by DeWayne Barnett |
| Designer: | Marek Pacynski |
| Description: | WWI German Fighter |

Kit: Another in Marek's new 1/33 scale. This model is available only in PDF format on CD. You will need Adobe reader and a color printer to print the model out on. There are seven pages on the CD, a cover sheet, five sheets to be printed on card stock, a history page and a page of diagrams. A detailed cockpit is provided which you will have to build as this is an open cockpit aircraft. Color scheme is very drab the aircraft being done in black and gray. The fuselage and tail are black with the wings being gray. A detailed engine is provide which must be built. Landing gear is fixed so there are no wheel wells.
Construction: Start construction with the Fuselage. This model uses the butt glue method, you construct each fuselage section and then glue a former in each end. When all the fuselage sections are built you butt glue them together. Install the cockpit in the correct section before gluing the sections together. Build the engine and glue the completed engine into the the front of the model. Cut and glue the wing frames together and then cut and glue the wings over the frame. Glue the bottom wing to the fuselage, then glue the struts to the bottom wings and fuselage. Now position the top wing on the struts and glue the wing in position. The landing gear is fixed on this aircraft . Build the main landing gear and wheels then assemble the parts and glue them to the bottom of the wings. Build the tail section and glue to the rear of the aircraft. .
First Impressions: Appears to be a well designed model that will make up to a good looking aircraft but because it is a biplane, card modeling experience is recommend.
| Atlantic Jamaican | Published by Kartonowa Flota |
| Designer: | Marek Borawski |
| Description: | Container Ship |

Kit: This 1/250 model comes on four sheets of A4 (8.5 x 11.5 inch) card stock. The cover sheet contains diagrams and a history of the ship. The second and third sheet contains all the rest of the parts to build the ship. The fourth sheet contains six different colored containers to mount on the deck. Everything is in Polish so you will be dependent on the diagrams when building the ship. Several things have been done to make assembly easier, parts that are to be reinforced with heavier card stock are marked with a red dot. Part numbers are outlined in blue so that you do not get confused with numbers on the parts where other parts are glued. The hull of the ship is white and the decks are brown.
Construction: Construction of the model is of standard ship methods that you see in almost all card ships. The hull is the "egg crate" method, cut the base and hull formers out and reinforce them. Glue the vertical frames on the base and then the horizontal frames to the vertical frames and base. Now cut the deck sections out and reinforce them, then glue the deck to the top of the hull frames. During the above make sure that everything stays straight, you can do this by gluing the base to a piece of wood or pining it to the wood or any other solid material. This is the key to building ship models, if you don't do this than the hull will warp and the model ruined. Now cut out the sides of the hull and glue then between the base and deck. Once the hull is finished now build the super structure, life boats, and the other details for the deck and super structure. Glue all of these to the proper place on the ship. Finaly build the containers and stack them on the deck.
First Impressions: The most complex of the Kartonowa Flota models. Still a simple little model that is ideal to cut your teeth on building ships out of card stock.
| Bennetton Camel B190B - 1991 | Published by Mega Graphics |
| Description: | Formula 1 Racer |

Kit: The model comes in booklet form with four pages of very colorful card stock. There are two pages of instructions in Czech along with very detailed diagrams. There is a sheet of metal photo etched parts available sold separately for this vechile. This model is completely detailed, the engine, transmission, under side and cockpit are all there with all their parts. Printing is very sharp with nice colors. The vehicle being done in purple and yellow with lots of gray and black. The parts are all, I assume, color coded for different areas of construction.
Construction: Instructions appear to be very detailed but since they are in Czech all I can do is describe the steps the diagrams show. First thing shown is how to build the axles, then the wheel mounts with brakes. Next diagrams show how to build the engine with 20 different parts. Diagrams shows mounting the engine and wheel mounts onto the chassis along with the super charger The outside of the vehicle is constructed and mounted on the chassis. Build the seat, seat belts, steering wheel and other cockpit parts and mount into the car body. Build the rear spoiler and mount behind the cockpit. Build the forward section along with the front spoiler and mount to the front of the car.
First Impressions: The company rates the difficulty of this model 4 out of 5. I would really like to see what a 5 is as this is one of the most detailed and complex card models I have ever seen. Because of this and the instructions being in Czech I rate this as extremely difficult and would recommend it only to the most experienced card modeler.
| Statni Hrad Rozmberk | Published by Erkotyp |
| Designer: | Richard Vyskovsky |
| Description: | Czech Chateau |
| Reviewer: | Mike Stamper |

Kit: This company may not be well known but the designer is. Anyone conversant with Czech kits will know the name of Richard Vyskovsky, perhaps one of best designers of intricate buildings. As with most kits, this one comes in book form and has over 320 numbered parts, this does not account for the number of duplicated pieces. For example piece number 64 is 30 small pieces. This applies to the windows and doors. The model is in 1:165 scale and sits on a base approximately 16 inches long by 8 inches wide.
Construction: Although I have not started this model, I am confident that it will have good fitting parts and although the instructions are in Czech the process of building should be reasonably straightforward. As with all Richard Vyskovsys models each part is numbered in numerical order This kit is further divided into a few sub sections. The parts for each subsection are marked in a different colour. It also follows his usual instructions by having various drawings with numbers round the edge (in the appropriate colour) and lines to the appropriate piece
First Impressions: Many of Richards's kits have appeared in ABC magazine and my confidence in the quality of this kit is based on the fact that I have built many of these kits. I hope my confidence is not misplaced! If I do get into difficulties Joseph Spinali of Spishop a Czech site has said I can contact him and he will translate the part of the instructions. How's that for customer service!!
Because of the size of this model the building review will be covered in several sections.
| Hawker Hurricane Mk. I | Published by Maly Modelarz |
| Designer: | Roman Staszalek |
| Description: | WWII British Fighter |

Kit: A 1/33rd scale model that comes in booklet form 210 by 287 mm. The booklet contains four sheets of card stock, one sheet of formers on regular paper and a little over two sheets of diagrams. Instructions are in Polish but the diagrams are clear enough that you should be able to build the model even if you do not speak Polish. Model is green and brown on top and light blue on the bottom. Printing on this model is very sharp and all markings can be easily seen. Parts are provided to build a detailed cockpit and wheel wells. A template for the canopy is provided with colored parts so you have a choice of whether or not you want to detail the cockpit.
Construction: Construction of the fuselage is of the "butt" type, build the fuselage in sections with a former in each end. When finished you butt glue the sections together to make the complete fuselage. Make sure that you build and insert the cockpit and wheel wells into the proper positions inside the correct section before assembling. Trying to insert the completed cockpit and wheel well into the completed fuselage could cause damage to both the cockpit, wheel well and fuselage. Build the framework for the wings, when you have completed the formers and attached them to the fuselage, cut, form and glue the wing skin over the formers. Cut and glue the frames for the tail to the rear of the fuselage and then glue the tail section skins over the frames. You can construct your own canopy using the template provided or you can glue the card canopy provide. Now construct the landing gear and wheels and glue them into the wheel wells.
First Impressions: Another of Malys re-releases. They are going through their older models and printing them on better paper with much improved inks. Much improved over the initial release.
| Augusta Victoria | Published by HMV |
| Description: | German Schnelldampfer built in 1889 |
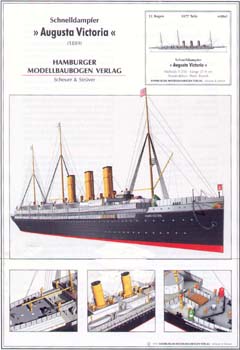
This 1/250 scale model comes on 12 sheets of A4 (8.5 x 11.5 inch) card stock along with six and a half sheets of diagrams. There is a sheet of history and a parts list in German. Included is a sheet with basic card modeling instructions both in German and English. There is no instruction sheet you are expected to build the ship using the diagrams which are very detailed. This is a waterline model and parts are not provided to build a full hull. Printing and colors are very sharp and striking. Avery detailed model with many small parts. HMV does make photo etched parts, purchased seperatly, for these small parts.
Construction: Construction of the model is of standard ship methods that you see in almost all card ships. The hull is the "egg crate" method, cut the base and hull formers out and reinforce them. Glue the vertical frames on the base and then the horizontal frames to the vertical frames and base. Now cut the deck sections out and reinforce them, then glue the deck to the top of the hull frames. During the above make sure that everything stays straight, you can do this by gluing the base to a piece of wood or pining it to the wood or any other solid material. This is the key to building ship models, if you don't do this then the hull will warp and the model ruined. Now cut out the sides of the hull and glue them between the base and deck. Once the hull is finished build the super structure and funnels and glue to the ship. Start building the detailing for the ship making sure that you look at the diagrams to get everything in its proper place.
First Impressions: A very well done kit that should make up into a beautiful model. Not for the beginner though, lack of instructions makes it necessary that you have some card modeling ship building experience.
| Fairey Battle MkI | Published by Digital Card Models |
| Designer: | Gabriel Panait |
| Description: | British WWII Light Bomber |

Kit: This 1/48th scale model comes on two sheet of card stock and one sheet of diagrams. The model I received was sent to me over the Internet in PDF format. There are no parts provided to build the cockpit so if you want to detail one you will have to scratch build it. The canopy, greenhouse, is proved on colored card stock. The model does not contain any internal formers except for those used in the center section of the wing. There are no wheel wells but landing gear is provided which is glued to printed wheel wells on the bottom of the wing.
Construction: Cut the main fuselage part out, and I suggest that you make and glue a connecting strip to one end of each fuselage section. Glue the individual fuselage sections together using the connecting strips. Reinforce the two wing center formers and glue them through the fuselage. Cut fold and glue the wings and then glue them to the fuselage over the two formers you just glued in. Cut the pieces out to make the tail section, form and glue them together, when shaped glue to the rear of the model. Build the canopy, greenhouse, and when finished glue to the top of the model. Finish up the model by building and attaching the propeller and wheels.
First Impressions: A very nice looking model but I would recommend some card modeling experience before attempting to build it.
| M.A.N Tractor | Published by Fiddlers Green |
| Designer: | Ron Caudillo |
| Description: | Puller for the Ground Launch Cruise Missile Units |

Kit: The first of this years Fiddlers Green Models. This model is provide electronically and comes as a PDF file that contains four files. You will need some type of color printer to print the sheets out on. A good quality card stock is also a requirement. I recommend a 90# Exact Index as the card stock. The models prints out on three sheets of 8 1/2 x 11 card stock which contains all the parts and one sheet on regular paper of the same size which contains the instructions. The model is made up of 57 parts and is colored in standard USAF camoflauge.
Construction: Start by cutting and forming the three pieces of the frame and the cab out. Fold the pieces and glue using the tabs together. Build the auxiliary equipment box and glue to the frame. Make the air cleaner and spare tire and glue to the frame. Build the camouflage box and 5th wheel assembly and glue to frame. Build the fuel tank and storage box and glue to the bottom of the frame. Build the eight tires, four suspensions and four axles. Glue the suspension to the bottom of the frame, the axles to the suspension and finally the tires to the axles.
First Impressions: A very nice little model that will go good with the TEL unit previously released by Fiddlers. The model should be able to be built by someone with no card modeling experience and would be a good project for the younger builder.
| 1:24 US Willys Jeep | Published by Erkotyp |
| Designer: | Richard Vyskovsky |
| Description: | WWII Jeep with trailer and accessories |
| Reviewer: | Neil Linnell |

Kit: This kit is yet another example of an excellent Czech vehicle model that has been published for a while but is just recently getting some attention in the U.S. market. The kit consists of four and a half pages of tightly-packed parts, another page and a half of diagrams, and what appears to be some comprehensive instructions in Czech. The printing is very good; not quite the level of detail as found in a Halinksi or GPM military model, but more depth and detail than normally found in a Fly or Modelik. There are two things that really set this jeep model apart from other versions of this same subject. First, as is typical of Czech-designed vehicle models, the jeep is designed so that the front wheels can turn (steer). This is a nice detail that makes for interesting display possibility. Second, included with this model is a trailer, a canvas top for the jeep, and a multiude of accessories such as a machine gun, a bazooka, several fuel cans, assorted ammo and supply boxes, and hand tools. This is a jeep that's ready for work!
Construction: Construction is pretty straight forward. The model is started by building the vehicle chassis and suspension first, including the steerable front suspension assembly. The steering assembly is actually not too difficult, but you will need some pins that hold things in place and allow free movement of parts. Straight pins trimmed to the appropriate length work well. Next, the body work and interior details are put together and the body is attached to the chassis. The model is complete with various exterior details such as wipers, handles, lights, spare tire, etc. The trailer construction follows the same formula: chassis, body, details.
First Impressions: While this is not a simple model, it's also
not impossibly difficult or complex. Anyone with moderate amount of card modeling
experience should enjoy building this model. If you are looking to build a model
of this most famous of military vehicles, I don't see how you can go wrong here.
This column does not cover all the new card model aircraft and ships that have been released this month. It contains only those models that have been sent to me by dealers and designers for review or that I have been purchased for review. Due to space restrictions, some models sent in for review may be held over until next month.
Thanks to the following for providing kits for inspection and review:
