Photos by the author

The Junkers F13 was the world's first entirely metal-build passenger airplane, which was especially developed for civil aviation. Its design was a revolutionary step forward to what would become the modern airline industry, and it was the intention of Junkers to contribute to the new transportation business not only by providing a passenger airplane but also by funding his own airline. After its maiden flight in 1919 the Junkers F13 was produced for over 10 years in various version undergoing continuous improvements. In many areas of the world this little airplane marked the beginning of a new area in civil aviation.
You can read more about the history of this remarkable airplane on the Internet under:
(in German)
(in English)
(in English)
For a few years Schreiber-Bogen has offered a nice model of the Junkers F13 in 1/50 scale, which in my opinion deserves more attention.

The Kit:
Beside the cover sheet, the kit provides one page with assembly instructions, two pages with a description of the airplane's history in German, English and French, four pages holding the parts of the model and one extra sheet of 1 mm thick cardboard. The paper and the printing quality are very high, and I liked the layout of the kit. The instructions are given only in the form of a general illustration explaining the basic principles of building Schreiber paper models, eight building diagrams and two photos of a partly assembled model. For me those diagrams were sufficient to build the model following the consecutively numbered parts. With only 58 parts - some of them consist of more than one piece - the kit is not a very complex task. Beside the materials provided by the kit, I used a second sheet of 1 mm thick cardboard and some transparency to build the windows.
Construction:
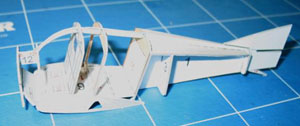
I started the construction of the model by laminating all parts marked by a "K" on 1 mm cardboard, for which two sheets of cardboard were required. As the kit provides only one sheet, I had to obtain a second sheet. After giving the laminated parts one day to dry completely, the internal structure of the fuselage was build according to plan. The pieces numbering 1 to 15 fitted very nicely, and the only change I did, was cutting out the window in part 7 to replace it by some transparency. As the model offers all parts to build the entire interior of the passenger cabin, I wanted "real windows" to show all those details within the finished model. Note there is a small mistake in the marks indicating the folding of part 1a: the piece should be folded to the inside and not the outside as indicated.
The interior of the model consists of the parts 16 to 20. Again the parts fitted together nicely, and at the end the passenger cabin offers seats for four passengers; and you can find a fully equipped cockpit for two pilots. In addition, part 20 provides a simple replica of the airplane's engine. If you build the model according to plan this little engine will disappear under the hood, but I am sure that you can build the model with very little changes on part 22 (the engine hood) leaving one side of the hood open to show the engine room.

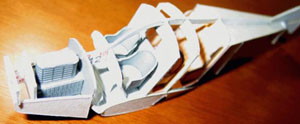
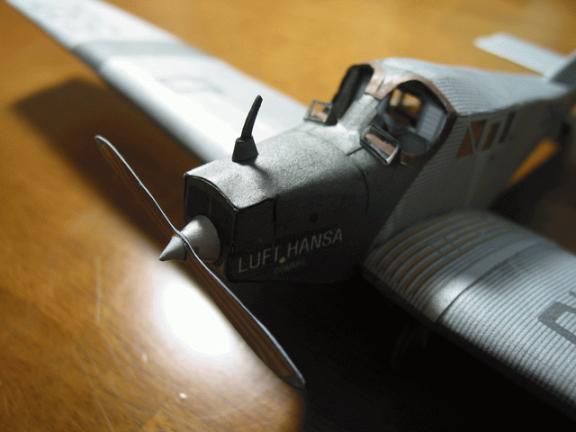
After finishing the fuselage's framework and all other parts of the interior, the outer part of the fuselage was added. Nearly the entire outside of the model comes in one single piece, part 21, which was the most difficult work of the entire model. The designers did not indicate where to bend this part, as they probably did not want to disturb the appearance of the finished model. It took my one whole evening to bend and dry-fit this part again and again until I felt like adding some glue to it. Similar to part 7, I cut out the window from part 21 and replaced them by some transparency. The work on the fuselage was completed adding the hood and front part of the engine room (parts 22 and 23), the tail unit (parts 24 and 25), and some other small pieces including the exhaust pipe (parts 26 to 30). Again for the parts of the hood it was not indicated where to bend and fold them, and I had to dry fit those parts before gluing them to the model. There was also no indication where to place part 28. For the pilots' windscreens (parts 29), I used again some transparency.

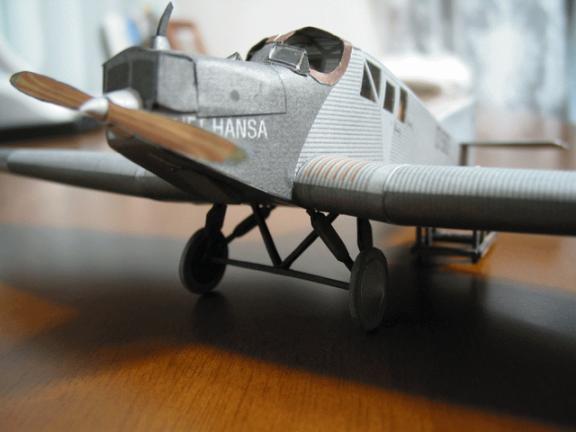
The next step was the construction of the wings (parts 31 to 43). After the assembly of the internal framework the wings were covered on the outside; these pieces fitted together very nicely and after a short time the wings were attached to the fuselage. The model was then completed adding the landing gear (parts 44 to 48) and the propeller (parts 49 to 51). Again those parts fitted well.

In addition to the airplane, the kit provides a small step for the passengers to board the aircraft. The step consists of the parts 52 to 58, which were rapidly assembled into a small gangway; and it looks nice beside the airplane.
Overall I have very much enjoined building this model. The model fits together very well and most parts are straightforward to build. Schreiber-Bogen ranks the model with 2 on a scale from 0 to 3. To my feeling this is quite justified as beginners may face some problems with some more complex parts like the outside of the fuselage. In conclusion this kit is highly recommended.


Summary:
| Model: | Junkers F13 |
| Kit: | Schreiber-Bogen |
| Designers: | A. Hansen and P. Tabernacki |
| Scale: | 1/50 |
| Difficulty: | Medium |
| Parts: | 58, some of them consisting of more than 1 piece |
| Instructions: | Schematic diagrams |
| Fit: | Very good |
| Coloring and Artwork: | Very good |
| Printing: | Very good on nice paper |
| Resources: | http://home.t-online.de/home/anhof/index.htm#InhV |
